
Tech How-To
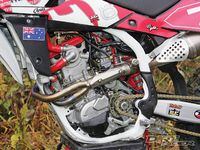
I was relatively unfamiliar with the modern Husqvarna seven days prior to the first GNCC of 2008. Due to a delay in the production of the BMW 450s, I had a crash course in all things Husky, as Summers Racing rode them instead of the absent Beemers. The team ended the 2008 season with numerous class wins, a GNCC class championship, some regional overall victories and a National Hare Scramble overall win and the first podium at a GNCC. Those national results were better than Husky had done since GNCC legend Ed Lojak did the job in 1988. That says a lot about the capability of the modern Husky right out of the box.The gas tank that comes on these bikes is not the best for what we do. It's too small, the brass inserts can spin in the plastic and the threads in the gas cap can bind when you're in a hurry. Other than that, I've become quite a Husky fan. These steps document the modifications we felt the bike needed to perform at the highest level. The things omitted from this list really earned my respect. Consider the following:-Husky four-stroke spark plug access is as easy as a two-stroke.-Adjusting the valves is easier than on any other shim-style four-stroke, but you hardly ever need to.-The TXC (carburetor) and the TE (fuel injected) 450s have kick- and electric start, and they start dead engine as fast as a two-stroke.-You can remove the shock without removing anything else.-After a whole season of racing and riding we have not replaced a clutch, a clutch hub or a wheel bearing!-Husky pistons and rings last an unusually long time.-The seat comes off as fast as you can say "dzus."-The TXC comes with a titanium/aluminum header/muffler combo that screams high performance.-The subframes are aluminum, but we've never seen one bend or crack.-Before we got the radiator guards from Flatland Racing we crash-damaged radiators that then lost all coolant. Both times the engines finished three-hour events while air-cooled only for an unknown period of time. Some electrical components discolored, but the engines weren't damaged.Getting back to the technical stuff, most of the things we did only really apply to very difficult off-road riding or racing. We try to prevent any mechanical failures, so we take precautions that may not be necessary for the average Husky owner. We also ride our bikes more than average, so our bikes may get more abuse in one year than most Husqvarnas will see in a lifetime. This list was compiled utilizing my team's own experiences throughout this year and some great advice I received during my indoctrination from some longtime hard-core Husky dealers like Gerald Jones from Upstate Cycle, Jay Hall from Hall's Cycles and George Erl from Up-Tite Husqvarna. I have tried to list these tips in the order that I'd pursue them just in case time, budget, desire or work ethic is limited. What follows is, in essence, a Husky TXC four-stroke handbook.
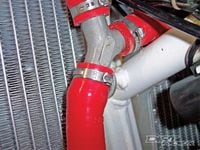
-Scott Summers, five-time GNCC champion, four-time National Hare Scramble champion, Summers Racing Team Manager.****01 It is vital to dry the air filter and start your bike after washing it. Let it run until the engine is good and warm. If you don't, water can gain entry through the header pipes, and if the bike sits, the exhaust valve guides can rust, which will prevent the valves from moving.02 The crossover hose between the two radiators can split in a very high-temperature, low-riding-speed, hard-on-the-clutch situation. To prevent this from happening, replace that hose with a piece of 5/16-inch fuel injection hose purchased from your auto parts store. Fuel injection hose has more reinforcing and will withstand higher temperatures and pressures.03 Extreme coolant temperature can damage the plastic T behind the left radiator. Up-Tite sells an aluminum Y that replaces the plastic T. For those not concerned about a few grams of weight, Lowes has a brass hose barb T that fits perfectly as well.04 When doing big jumps we found it possible for the battery to escape its intended location. We used a flat-blade screwdriver heated with a propane torch to melt rectangle-shaped holes in the rear fender bracing area below the battery. Then we took two heavy-duty cable ties (30-inch long) to trap the battery between the subframe and the rear fender where it's designed to be. The battery can damage the air filter if it comes loose and you may not be aware of this damage while riding, so more problems could result. The battery sits in a molded plastic area that's part of the rear fender. The battery's bottom can develop grooves over time where it rests due to all the movement, vibration, etc. We cut and bent a thin piece of aluminum (1.25mm thick) to place between the battery and the fender and duct taped it to the battery to prevent those abrasion grooves.05 The muffler gets close to the airbox, so it's a good idea to either wrap the muffler with header wrap in that area or to use JB-Weld Quick or red high-temp silicone to attach some insulated material like aluminized glass cloth to the airbox in that location. I bent a thin piece of aluminum (1.25mm thick) and put the insulation behind that, then riveted the aluminum to the airbox. If you use header wrap in this area, it protects your leg and the airbox. However, the elements and a pressure washer are hard on header wrap.06The only difference that I'm aware of between the 510 and the 450 is that the 510 has a longer stroke. I chose to ride the 510 this year, simply because I have always liked Open bikes. I'm 42 years old and the 510 has more power than I felt I could use effectively, so Gary Gramer at Holeshot Motorsports machined 20-thousandths from the piston dome to reduce the compression ratio. The bike became less of a drag racer and more of a tractor. I believe this mod is responsible for other positive effects that were not so easily noticed, such as even easier starting, cooler operating temperatures, less wear and perhaps even better gas mileage.
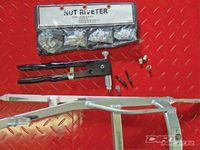
07 The jetting that really seems to make my low-compression 510 and the stock-piston 450 happy is a 182 main, stock OBDVR needle, fourth clip position, 55 pilot, diaphragm rod adjuster screw three turns out from all the way in for the 510 (four turns out from all the way in for the 450). The mixture screw two turns out. The leak jet standard (plugged). The starter jet is the standard 85. These adjustments are made keeping the following in mind: We used Cam 2 110-octane race gas mixed 50/50 with pump gas, and we ran a Twin Air foam filter, the stock header and the stock Husky optional (Arrow) muffler.08 In the subframe are Riv-Nuts that provide the threads the side number plates screw into; these can spin if not seated correctly. They're installed and then squeezed against the inside of the square tubing with a tool that works sort of like a rivet tool. The installation tool should seat the knurled surface into the aluminum. If a bolt won't loosen inside one of these Riv-Nuts, remove it by using Vise Grips on the head of the bolt and then turning the bolt counterclockwise while putting a side load on it at the same time. Once removed you can use a Riv-Nut tool to seat the Riv-Nut better and correct the problem forever. K&L; (www.klsupply.com) sells these tools, but they're very expensive; we found an inexpensive lesser-quality version at Harbor Freight (www.harborfreight.com). Your Husky dealer might have this tool and be willing to tighten up the inserts if you have it happen. It's a piece of cake if you have the tool. MSC (www.mscdirect.com) also sells this tool for $29 and those Riv-Nuts come in handy for other projects as well.09 In the unlikely event that the left radiator gets bent forward, the radiator hose will come in contact with the header pipe which will burn a hole in the hose. We wrap the inside header pipe with exhaust header wrap and we used a thermo sleeve made by Thermo Tec that fits over the radiator hose in this location. We also bolt on aluminum radiator guards to strengthen and protect both radiators. In fact, we have not had to replace one radiator since we started using the guards manufactured by Flatland Racing. We do bend the rear mounting bracket to prevent sharp edges from contacting radiator fins. I haven't boiled over any radiators or seen the standard hoses fail, but we take the following preventive measures to our cooling system: install a 1.8 radiator cap, install high-temperature silicone hoses (CV4) and run Spectro coolant. We don't remove the standard coolant recovery bottle.10 At the junction where the header goes into the muffler, I've seen people melt their riding pants and/or boots. When riding, my leg does not touch this area, but if you're standing or leaning against this spot when it's hot, you could melt your riding pants. Up-Tite makes an aluminum guard that shields this spot from human contact. I've also heard the guys at P-3, Pirie Performance Products(www.pirieperfprod.com), make a guard out of composite material.11 You can remove two bolts/springs out of the clutch (on opposing sides), so you go from six to four bolts. This reduces the effort at the lever about 30 percent, and after 12 hours of racing we've seen minimal wear on the plates and no perceived slipping.12 We noticed the rear brake hose can rub on the right-side engine cover as the swingarm moves through its range of motion. We split a piece of radiator hose about 4 inches long, safety-wired it around the brake hose in the friction area then coated the aluminum in this area with Dev-Con Flexane 80 putty. It's black, it covers any wear marks, it looks good and all abrasion ceased. Grainger (www.grainger.com) was our source for the Dev-con.13 After multiple rides and pressure wash cycles the linkage pivot closest to the bottom shock bolt will be the first to collect dirt and to seize, whereas all other linkage pivots stay free moving longer as they are less susceptible to contamination. One way to help this pivot stay clean and greased longer is to slide a 4-inch piece of neoprene fork seal saver over the lower shock clevis and the linkage pivot. The neoprene will get damaged from coming in contact with the ground, so we replace it quite often, but it works.14 As I mentioned earlier, the shock can be removed without taking off the subframe. The procedure is to rotate the shock reservoir away from the carburetor to remove and the opposite to install. The rear wheel/swingarm needs to be raised and lowered at two times during shock rotation. Once you do it a few times it's easy.15 We safety-wire the little clips that hold the brake pad pins in place just as a precaution. Sticks or stones may try to extract these clips otherwise.
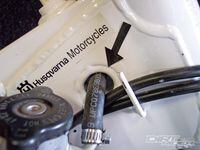
/cloudfront-us-east-1.images.arcpublishing.com/octane/TS4CQC6KHZHHNG2DT44EOMISSA.jpg)
/cloudfront-us-east-1.images.arcpublishing.com/octane/AW6VAJP355AJVMXNDZ3CCBOWJM.jpg)
/cloudfront-us-east-1.images.arcpublishing.com/octane/TNWYBCGJB5H45PLJQBCOLD5RWU.jpg)
/cloudfront-us-east-1.images.arcpublishing.com/octane/IRZZYHO4XVDHRH22P2ZDQDRYHM.jpg)
/cloudfront-us-east-1.images.arcpublishing.com/octane/NNX5PHJJTBCKNJGQDQZDFRHYR4.jpg)

/cloudfront-us-east-1.images.arcpublishing.com/octane/3GVBLEXDJBCMDPQSU3DCLA2ZIU.jpg)

/cloudfront-us-east-1.images.arcpublishing.com/octane/VM4IESJWNVADRCTV4XHH24PGPA.jpg)
/cloudfront-us-east-1.images.arcpublishing.com/octane/HM5XHDOCUJAONMRU7G3W3XT3DM.jpg)
/cloudfront-us-east-1.images.arcpublishing.com/octane/PKDJEFNWPFC5FBQIQKWFNZXUWQ.jpg)
/cloudfront-us-east-1.images.arcpublishing.com/octane/52VYACHLOJFIJBXCVVF6HOBTXQ.jpg)
/cloudfront-us-east-1.images.arcpublishing.com/octane/EMZFWPV7WRDXBO5MLMM6K3UVYI.jpg)
/cloudfront-us-east-1.images.arcpublishing.com/octane/7UZTUEXJIRB7TEFC4AL3JFBH2I.jpg)
/cloudfront-us-east-1.images.arcpublishing.com/octane/HKD4ZFEEENFJHHXSB6KTJI3FWQ.jpg)
/cloudfront-us-east-1.images.arcpublishing.com/octane/LH7UVED36VFYDPF5A3KQFITAH4.jpg)
/cloudfront-us-east-1.images.arcpublishing.com/octane/EY2VN2TTQFEJZDSC7ZGZ56WCYI.jpg)
/cloudfront-us-east-1.images.arcpublishing.com/octane/2SM4ULIAVNGGHHDUKX6SYM54EU.jpg)
/cloudfront-us-east-1.images.arcpublishing.com/octane/YXOSJ6I63NCMTFONHYHSNC4F2Y.jpg)
/cloudfront-us-east-1.images.arcpublishing.com/octane/XLOLUX32YNFAPOSIW66MPKPZWU.jpg)
/cloudfront-us-east-1.images.arcpublishing.com/octane/7DFD3M45PRGDNNOJZN2OVZC5WI.jpg)
/cloudfront-us-east-1.images.arcpublishing.com/octane/3KOF6RMQFRA2HCFI5B4F35V5R4.jpg)
/cloudfront-us-east-1.images.arcpublishing.com/octane/DBVJETHGPRE4BFMDJUZ6JDSWWE.jpg)
/cloudfront-us-east-1.images.arcpublishing.com/octane/X2MQDB3UYZAIDGAPPP7UR6FHDE.jpg)