
_Thread Repair
_
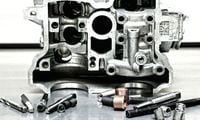
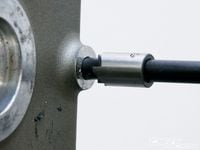
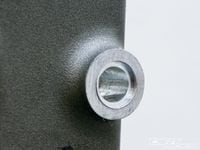
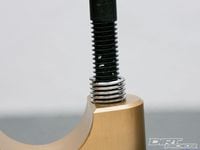
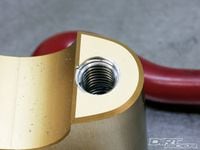
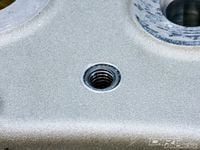
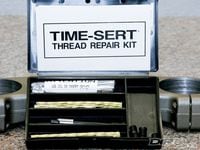
We have all been there if you have worked on dirt bikes long enough-you're tightening a bolt and that sick feeling rushes in when you suddenly feel that pop, snap or little or no resistance. If you're lucky, the bolt broke and you can get it out-simply install another. If luck abandoned you, the threads will need to be fixed. The problem is our bikes have a lot of steel bolts that thread into aluminum, brass or even plastic. That is not a good recipe for exceptional thread life. Depending on the damage, sometimes the threads can be cleaned up, but the tools we're looking at here are for more extreme cases. Unless the casting or other part you're working with is exceptionally thin with little metal surrounding the threaded hole, the threads can usually be repaired or, perhaps more accurately, replaced. There are several options on the market, but the leading two are HeliCoil (and the multiple knockoffs of that brand) and the Time-Sert. In both cases the stripped hole is drilled out and tapped to a larger, specific size and a coiled spring (HeliCoil) or a machined insert (Time-Sert) is threaded in. Making things easier these days is the fact that Flanders Company (www.flandersco.com) is a distributor for both brands, so you can order from the site or any dealer or repair shop. We repaired junk holes with both types of insert, and either work well for different situations. The Time-Sert install kit comes with twice as many tools as a HeliCoil kit, so it is more expensive but is also considered a better repair if there is room for the shouldered insert. Once you have the install kits you can simply buy more inserts. You will need an install kit for each size thread, though. Here is how it works.


/cloudfront-us-east-1.images.arcpublishing.com/octane/V5HV72XGS5BDBLGO7KNAPV2SKE.jpg)
/cloudfront-us-east-1.images.arcpublishing.com/octane/X4HH3H6LWFEAXFAOS4D7WPCBGU.jpg)
/cloudfront-us-east-1.images.arcpublishing.com/octane/KIWKUCDIAZEDXBC53B4CL23XX4.jpg)
/cloudfront-us-east-1.images.arcpublishing.com/octane/Z7SDMK75WBCKPOECPH2ZZC3MSE.jpg)
/cloudfront-us-east-1.images.arcpublishing.com/octane/2D4H2OGFH5ABPA4WIRHNSMBER4.jpg)
/cloudfront-us-east-1.images.arcpublishing.com/octane/MNV7VIZGBZACLJBL2WV7WVO7VU.jpg)
/cloudfront-us-east-1.images.arcpublishing.com/octane/H3ANF3MCT5BONNQAQISDYEJA4I.JPG)
/cloudfront-us-east-1.images.arcpublishing.com/octane/J7F3JQP2OVDLXDZ7VBJDMVGB4A.jpg)
/cloudfront-us-east-1.images.arcpublishing.com/octane/D3SZKDPELNAKPNAQIHTLZRF5QM.jpg)
/cloudfront-us-east-1.images.arcpublishing.com/octane/H5VKBUL2Z5BYDAOQOUQAHKOTEU.jpg)
/cloudfront-us-east-1.images.arcpublishing.com/octane/C2HS5ADXIND7LBDK37LGI5RN4E.jpg)
/cloudfront-us-east-1.images.arcpublishing.com/octane/SCDNATMCERHOHPEVO3JPCS6M2Y.jpg)
/cloudfront-us-east-1.images.arcpublishing.com/octane/TOQ7IBXN2BAV5MELGO5Y3W64UE.jpg)
/cloudfront-us-east-1.images.arcpublishing.com/octane/CSQ5SXR2QZEYLIH4GZVFYPKXNU.jpg)
/cloudfront-us-east-1.images.arcpublishing.com/octane/MLARWRCDL5HH3FYTXFXK26ARF4.jpg)
/cloudfront-us-east-1.images.arcpublishing.com/octane/QHHRQIMLX5DQREULLI7LJT2WOM.jpg)
/cloudfront-us-east-1.images.arcpublishing.com/octane/2MFKDMEXI5A2PAB2BCLJ4TE6CI.jpg)
/cloudfront-us-east-1.images.arcpublishing.com/octane/BCRBSND54FE3BDDWWMPP6LWCAY.jpg)
/cloudfront-us-east-1.images.arcpublishing.com/octane/53OLCW5X45HRTLKV5OVHFCJSJA.jpg)
/cloudfront-us-east-1.images.arcpublishing.com/octane/PUS7VYTISVCVXGLWRGNHS7ZR4M.jpg)
/cloudfront-us-east-1.images.arcpublishing.com/octane/UO25RAAEQJDIVLNGY2L7S4IRDQ.jpg)
/cloudfront-us-east-1.images.arcpublishing.com/octane/3GQBZGCTXRE35IIIOI22RBQSOU.jpg)
/cloudfront-us-east-1.images.arcpublishing.com/octane/OIT4RWYSOJGOFJE2LLVSYGMRXY.jpg)
/cloudfront-us-east-1.images.arcpublishing.com/octane/Z4GKM7BKVBAKDBN37S5R4QR4LA.jpg)