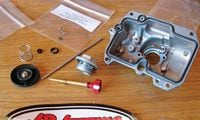
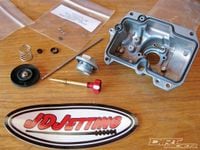
We've all been there: In the garage late at night wondering why the heck our girlfriend's dad's KTM won't start worth a darn, idle smoothly or have the common decency to resist backfiring on decel. OK, maybe that's just me. But what many of you can likely relate to is a carburetor that just won't work right.While the inner workings of these magical mixing containers are a mystery to most, it's really only a box with holes in it. So I decided to stop being scared, put some serious daddy issues on the line and give one doozy of a carb rebuild a try. Before I went to work, I called JD Jetting where James Dean himself recommended a short list of upgrades to the older FCR carb. If you have a carb question, just call or email James Dean (www.jdjetting.com). It makes life easier. JD recommended we upgrade the float bowl to a modern unit with a leak jet, install his needle and jet kit, replace and modify the accelerator pump diaphragm and linkage and stick one of his easily adjustable fuel screws in. Total, we are into JD Jetting for about $180. Add in $8 from Moose Racing for new carb vent hose and we're looking at around a sub-$200 parts bill for this fix.
The result? Well, considering I stuck old gaskets into a nonserviceable chamber of an FCR carburetor that was basically seized up from bad gas gone gooey, the result is amazing. The bike ran great right away, and during John's trip from Tecate to Mike's Sky Ranch and back it didn't miss a beat: "It was crazy! I took two-thirds the gas my son did with his KTM 450 and a guy on an XR650 did! Some could be riding style, but not all of it."


/cloudfront-us-east-1.images.arcpublishing.com/octane/HW5JR2M73FGVRKOMWR5V2UALXM.jpg)
/cloudfront-us-east-1.images.arcpublishing.com/octane/JV4YASHEPVELJNID4BLLKY4ZKQ.jpg)
/cloudfront-us-east-1.images.arcpublishing.com/octane/646LH2AYM5CI5OP56WCTRYBPGY.jpg)
/cloudfront-us-east-1.images.arcpublishing.com/octane/FBUJSX2P4JE7XON6OUK4OQCYTY.jpg)
/cloudfront-us-east-1.images.arcpublishing.com/octane/WOYUZXUAMBCZZJ3BQWOEQJGR5M.jpg)
/cloudfront-us-east-1.images.arcpublishing.com/octane/OBHVYZHWBBAZTALZA4GC5RM5WA.jpg)
/cloudfront-us-east-1.images.arcpublishing.com/octane/ZJPPRO5CRNFYPEVMWIFR7RRFQQ.jpg)
/cloudfront-us-east-1.images.arcpublishing.com/octane/MMAOLEHZG5CBXAOICNKNGCEK4I.jpg)
/cloudfront-us-east-1.images.arcpublishing.com/octane/KQUVDTNB6VF53CRDNN47BE3VUA.jpg)
/cloudfront-us-east-1.images.arcpublishing.com/octane/3T32INAZQRGPXOGGA36NQJDSSM.jpg)
/cloudfront-us-east-1.images.arcpublishing.com/octane/EPLS5PBKXBHNXK7S5O7G4ND3YQ.jpg)
/cloudfront-us-east-1.images.arcpublishing.com/octane/MNGOZAGZFZBH5DPFV7NOPF5S3Y.jpg)
/cloudfront-us-east-1.images.arcpublishing.com/octane/VGJWIIFM2VBCXG34KRQ37GCP7U.jpg)
/cloudfront-us-east-1.images.arcpublishing.com/octane/2ZU3HXRPMZESJF7HDLZJV7FHEY.jpg)
/cloudfront-us-east-1.images.arcpublishing.com/octane/VVFWQBZEIZDVJHZIW5ISKWKOZU.jpg)
/cloudfront-us-east-1.images.arcpublishing.com/octane/7T7FZXHIIBDX7AOBD5S3IICUJI.jpg)
/cloudfront-us-east-1.images.arcpublishing.com/octane/T3Y7A52TXBEBJNEPGOQSVPQSPU.jpg)
/cloudfront-us-east-1.images.arcpublishing.com/octane/KY33U3WBTNFIBJFMTEF2SM7BOQ.jpg)
/cloudfront-us-east-1.images.arcpublishing.com/octane/JNPS5MGVXJC7BARVMARYQIQHXE.jpg)
/cloudfront-us-east-1.images.arcpublishing.com/octane/63N2P6SYAZDURJDO5KARQYX2J4.jpg)
/cloudfront-us-east-1.images.arcpublishing.com/octane/C72WX35SXFETTO5OVA2RWT523I.jpg)
/cloudfront-us-east-1.images.arcpublishing.com/octane/F3ER37EV2RGY5CRYFNTWE3JSF4.jpg)
/cloudfront-us-east-1.images.arcpublishing.com/octane/L65QCUR32RH2NKCUHXYHHAPDFI.jpg)
/cloudfront-us-east-1.images.arcpublishing.com/octane/VSK246VVRRDMBNQU7B2NTNY6AE.jpg)