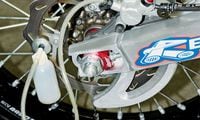
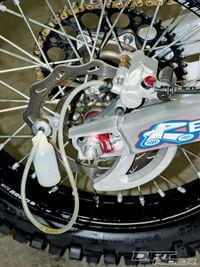
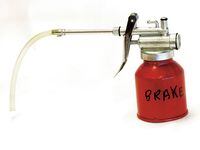
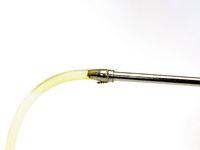
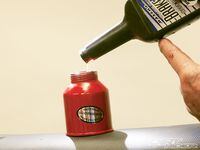
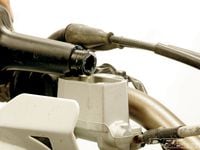
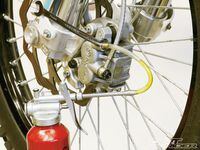
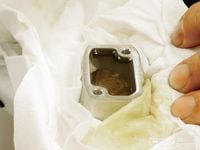
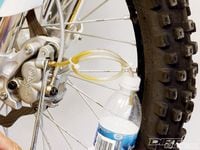
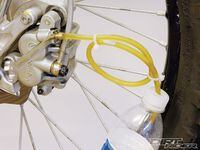
In the past, Dirt Rider has illustrated the proper methods of bleeding brake systems, but each time those processes assumed that you have good pedal or lever pressure to pump the fluid through. If you have changed the brake line, the process is a bit tougher. If you change the caliper, then the entire system is nearly dry and it takes some tricks to get the job done in a reasonable amount of time. You will need to buy some tools, but the price should be less than $10 for the lot. You will also need proper brake fluid and paper towels. At some point a helper is almost vital.All that is left is to make sure the reservoir level is correct and button things up. It is most important to avoid overfilling, since that can lead to brake lockup in extreme cases. Remember that the screws holding the master cylinder cap call for next to no torque. We don't even have a wrench that reads low enough, so they go barely past finger tight. Now the brake system should be leak-free and ready to do business.


/cloudfront-us-east-1.images.arcpublishing.com/octane/PXDBJAHBNFHIPIII2RETRYIHV4.jpg)
/cloudfront-us-east-1.images.arcpublishing.com/octane/IP7MOVDXWFCGJH5HQHH4T44UJI.jpg)
/cloudfront-us-east-1.images.arcpublishing.com/octane/Y4EZFRIEQRE7ZFINGRA2ONFGGQ.jpg)
/cloudfront-us-east-1.images.arcpublishing.com/octane/UIVE2WGHJRCGNLMDXYO2YR27PA.jpg)
/cloudfront-us-east-1.images.arcpublishing.com/octane/XVCN7KNMTFDHZMKMCH5DU5YZRU.jpg)
/cloudfront-us-east-1.images.arcpublishing.com/octane/DTPGQUZAIZAZNPRXG4V6QATIVM.jpg)
/cloudfront-us-east-1.images.arcpublishing.com/octane/Y7EYU3ZTTJFLZEA75REMWWBLSQ.jpg)
/cloudfront-us-east-1.images.arcpublishing.com/octane/TGSYZNI7UVEI7K7ULLVVQ324A4.jpg)
/cloudfront-us-east-1.images.arcpublishing.com/octane/XGKGRRHXPNDRBGPCV4FUAARLRE.jpg)
/cloudfront-us-east-1.images.arcpublishing.com/octane/4MNSJWN6UFEMTDQHVLM52C3X44.jpg)
/cloudfront-us-east-1.images.arcpublishing.com/octane/U6X2X4HGPNCYTNMPYOAN4IIJ5Q.jpg)
/cloudfront-us-east-1.images.arcpublishing.com/octane/B6ZIPVYSKVA3LHDJTGAEEMN4VM.jpg)
/cloudfront-us-east-1.images.arcpublishing.com/octane/I24MVSJBNZDALNIYUHHPVFWNZM.jpg)
/cloudfront-us-east-1.images.arcpublishing.com/octane/SIAXQ2ZOPNBYBLPKJPCHIYGG6A.jpg)
/cloudfront-us-east-1.images.arcpublishing.com/octane/2K6UXOH6I5E4HBKQVMPKA74RR4.jpg)
/cloudfront-us-east-1.images.arcpublishing.com/octane/B52ZU5WMNVF4FDYDONLARN26VU.jpg)
/cloudfront-us-east-1.images.arcpublishing.com/octane/7J4I2LIBRZB4DILKSLG54USBH4.jpg)
/cloudfront-us-east-1.images.arcpublishing.com/octane/LALZDRL5ORHUDGKA562HKNQQBM.jpg)
/cloudfront-us-east-1.images.arcpublishing.com/octane/4QSCGKH4JZACROBHROI55V6UBM.jpg)
/cloudfront-us-east-1.images.arcpublishing.com/octane/RMQHF3KBVVHVDAXXG66W7VFKMQ.jpg)
/cloudfront-us-east-1.images.arcpublishing.com/octane/3PZSH55PPRCILD6HP4LPQSQ6OY.jpg)
/cloudfront-us-east-1.images.arcpublishing.com/octane/RRB2FJLHGBGEBMP3R2Y4BUZH4M.jpg)
/cloudfront-us-east-1.images.arcpublishing.com/octane/SGDP7TBNIZCAXIPELLUO4EFFHI.jpg)
/cloudfront-us-east-1.images.arcpublishing.com/octane/7YYXO74VLVGOVB6QFDMMZSHW24.jpg)