09
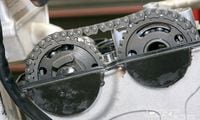
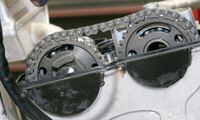
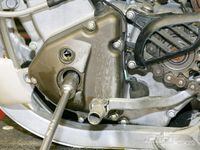
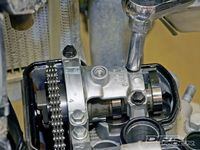
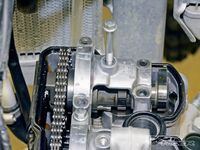
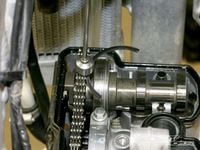
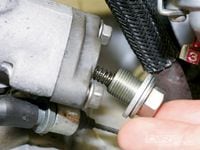
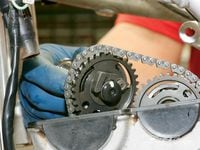
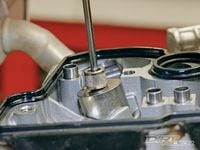
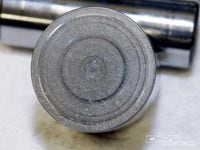
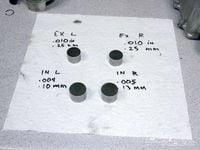
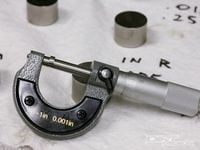
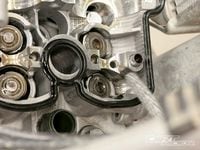
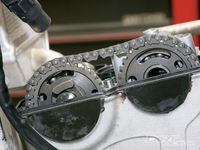
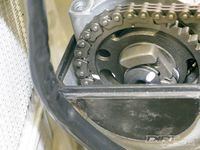
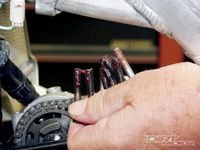
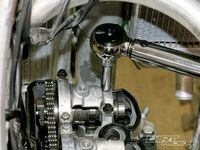
When modern four-stroke off-road bikes arrived, most featured some sort of shim-type valve adjustment. Screw-type adjusters at the end of rocker arms that we learned on are a thing of the past. Those adjust with a threaded tappet and a locknut. That is a dead-simple way to do the job, but not one well-suited to ultra-high rpm. Most performance four-strokes use a precision steel shim to manage the clearance between the valve stem and a metal bucket or tappet that slips over the valve spring. The shims can't come out, and they offer positive adjustment. The downside is that you need to have shims on hand, or make a trip to the dealer to get some. A single shim is less than $10, and shimmed valves generally don't need adjustment very often. We find it ultimately more economical and time-saving to keep a Hot Cams shim kit on hand. For the price of a few shims, you get all you will ever need. As we have lived with and worked on more varieties of four-strokes, we have learned of some tips and tools that make this job much easier. To check or adjust your bike, wash it thoroughly, clean and organize your work space and dig up your manual.07 With slack in the chain you can lift the end of the exhaust cam, angle it and lift it out. You should not need to force anything here. Once the exhaust cam is out, start on the intake cam. The exhaust cam has the automatic decompression system, so it can't be confused for reassembly. Set the cams where they will be safe and stay clean until reassembly.08 A telescoping magnet works great to lift out the tappets or buckets and shims. Sears has one that is shielded with an outer collar so the very end is the only part that is magnetic. Keep track of the location of the tappets; they need to go back into the same holes if they are to be reused.09 The shims sit in these pockets, but frequently they will lift off with the tappets when you use a magnet. Make sure the aluminum bearing surface (arrow) shows no wear. Engines that have only one bearing on the cam use high-pressure oil film between this aluminum surface and the steel cam. The surface has to be perfectly smooth to work properly.10 It's normal for the tappets to spin in the bore. Eventually the top will start to show a circular wear pattern like this. Any sign of wear means the tappets should be replaced. If the cams are replaced, new tappets or buckets should be used as well. The tappets may also show wear on the side where they contact the bore.11 Some mechanics use an egg carton or a plastic box divided into four compartments, but I use a paper towel to hold the buckets, shims and my notes about clearance. Even though I set the parts down, in order to make it easy to keep track of them I label which bore the tappet came out of.12 All valve shims are labeled in millimeters. Some manuals have a mathematical process to decide what shim to use, but unless the clearance is way off, one shim size will typically bring the engine back to spec. The problem is that the shims coming out usually aren't legible. You must measure them. This digital caliper was under $20 at Harbor Freight, and it is plenty accurate.16 This dot on the front of the exhaust cam (marked with white paint pen) needs to be aligned with the upper surface of the head. Some manuals will show a number of pins that should be between the top dots on the cam-chain sprockets. Put tension on the cam chain by pushing your finger through the tensioner hole when checking alignment.17 Install the cam caps making sure all the dowel pins are in place and that the C-clips are properly locating the cam bearings. Use grease or assembly lube on the threads of the bolts to ensure proper torque values. We wiped these off a bit after dipping them in grease.18 Torque these bolts very carefully with a quality torque wrench. Make sure the wrench reads down to low enough settings if you have to buy one. The torque spec is so light that these bolts rarely exceed one-quarter turn past finger tight. Work up to the final torque little by little in an X pattern. Now reinstall the tensioner and recheck timing.All that is left is to double-check the valve clearance, install the valve cover, the seat and tank. The rule of thumb for most mechanics is to shim the valves twice. After the valves have moved (almost always tighter) twice, it is time to replace them to minimize wear on the seats.


/cloudfront-us-east-1.images.arcpublishing.com/octane/PCXWZ5GQLRFFPJ7M7UGTETJEXQ.jpg)
/cloudfront-us-east-1.images.arcpublishing.com/octane/Q7KM7SH27VBIRMZ3XAIUHOWCTU.jpg)
/cloudfront-us-east-1.images.arcpublishing.com/octane/QBCJYVX6GBFRJOF67CQTOQWJRU.jpg)
/cloudfront-us-east-1.images.arcpublishing.com/octane/U6WTHXX6FZG5VMXN2X5X4JPV2M.jpg)
/cloudfront-us-east-1.images.arcpublishing.com/octane/U2L5VUGESJCYRGGIYVBTKAW5LY.jpg)
/cloudfront-us-east-1.images.arcpublishing.com/octane/SDPXS7Q2CVGRHI7TNZAUMHQVRU.jpg)
/cloudfront-us-east-1.images.arcpublishing.com/octane/4WKWAMC6PJBYXMGEOT6M3324K4.jpg)
/cloudfront-us-east-1.images.arcpublishing.com/octane/MUHABH5BPZCCDGBH3LMD6R63KA.jpg)
/cloudfront-us-east-1.images.arcpublishing.com/octane/DFFWUKLLEJAFBNZYSZMVZ3ZDGU.jpg)
/cloudfront-us-east-1.images.arcpublishing.com/octane/PYWSKZ2A5FAGLG5NMGFO7ZDVVY.jpg)
/cloudfront-us-east-1.images.arcpublishing.com/octane/IDV5JZQ5MVEFVN7VWEHUTY3TF4.jpg)
/cloudfront-us-east-1.images.arcpublishing.com/octane/TEEQ6FQCK5G5JNWFA743XPQ7PU.jpg)
/cloudfront-us-east-1.images.arcpublishing.com/octane/S4KLUEUZHZAITFWF3PUKKB7M7Q.jpg)
/cloudfront-us-east-1.images.arcpublishing.com/octane/5EEWHROAHNFQXIKLZLZFGI63YE.jpg)
/cloudfront-us-east-1.images.arcpublishing.com/octane/DKFBOYNXGBA4BBX7RV56BVCDIA.jpg)
/cloudfront-us-east-1.images.arcpublishing.com/octane/FUO6JBFXBBEM5LTVLDK4IHUJQ4.jpg)
/cloudfront-us-east-1.images.arcpublishing.com/octane/7NLQGJ7WHFESZN45JUKHFP7XDY.jpg)
/cloudfront-us-east-1.images.arcpublishing.com/octane/XOLGS2LTA5CJXMDYYQVG4J5UWA.jpg)
/cloudfront-us-east-1.images.arcpublishing.com/octane/7BXBM7ACSZC6ZC7BHXBVA4U2SE.jpg)
/cloudfront-us-east-1.images.arcpublishing.com/octane/TBIFCM4PXVAX5LPJCVQGV2KVE4.jpg)
/cloudfront-us-east-1.images.arcpublishing.com/octane/KRL7BN6CBBAIRCADBDYIKLDJNA.jpg)
/cloudfront-us-east-1.images.arcpublishing.com/octane/M3FGQCG3U5HWHFRON3QXRNAHUA.jpg)
/cloudfront-us-east-1.images.arcpublishing.com/octane/VMKOSILBJFH3BMRWXL433JN22M.jpg)
/cloudfront-us-east-1.images.arcpublishing.com/octane/QZEJDWVDXREVFA6RFWGIJV2AYY.jpg)