Dr. Dirt Fix A Flat On The Trail, The Dirty Part - Dirt Rider Magazine

Tech How-To
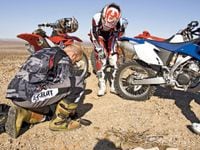
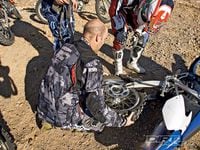
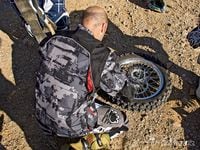
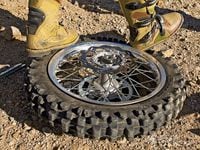
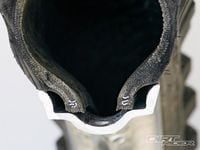
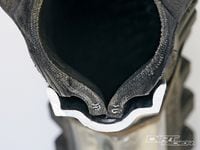
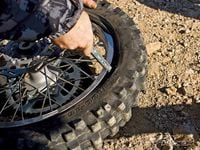
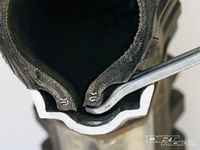
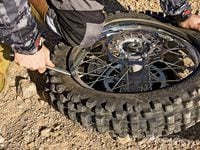
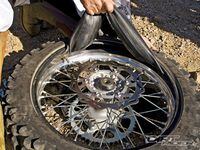
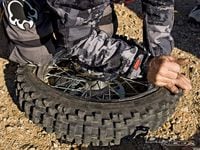
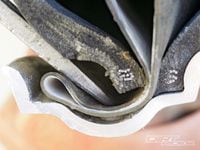
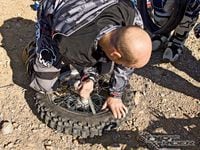
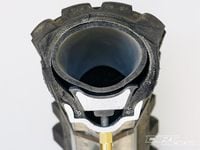
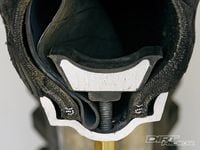
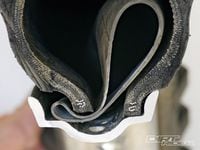
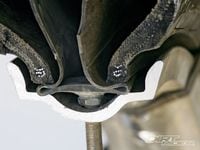
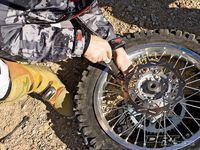
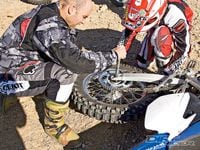
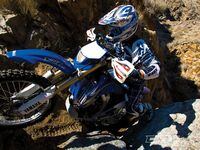
Many dirt riders groan at the thought of an afternoon burned changing a flat tire in the garage. But at least that misery is consigned to an area with shade, tools and refreshment easily at hand. What do you do when you get a flat on the trail or at the track? Do you let it ruin your ride? Or do you throw that bad boy in the dirt, wrestle in a new tube and fix that tire and your day of riding? You fix it and ride, duh! Fortunately (for you), Karel has more experience changing tires than most riders, with some 25-tire days, but Jimmy makes him look like a novice. On an off-road test one rider had a flat, and we had a pro photographer to document the process. Then we sacrificed an old wheel, and cut it in half to better illustrate what's happening when you change a tire.

01 Before you get carried away, take an inventory of your tools and flat repair supplies to make sure you can complete the job in the field. It is a good idea to use your fanny pack to change tires at home, so you know you have everything you need.
02 Start by removing the rear wheel. This is another reason you need to do tire changes at home using your fanny pack tool set. Ryan Orr has just realized that this WR axle was not tightened with a six-inch crescent wrench.
03 With the axle nut off, turn off the fuel and lay the bike down so the axle head is facing up. Pull out the axle, and set it where it won\'t get dirty. Jimmy placed the other hardware on his tool roll to keep track of them and keep them clean.
04 Get the chain off the sprocket, and pull the wheel straight back out of the swingarm. On most bikes the wheel spacers are identical from side to side, but keep track of them. You don\'t want to lose them or mix them up.
05 Look for a flat, fairly firm spot to work. Most riders include a shop towel in their packs; use that under the sprocket to keep dirt out of the axle\'s hole. Loosen the rim lock and remove the valve core from the tube at this time.
06 Jimmy shows the most effective way to use your boots to break the bead on a tire. The longer the tire has been on the rim, the harder it will be to break the bead loose. Using a heel close to the rim maximizes your efforts.
07 The rim has a dip or well in the center to allow you to change tires. The bead of the tire must be down in the well of the rim on one side, so you can work the tire over the rim on the other side. These beads are pushed in but are not down in the well.
08 With the bead of the tire pushed into the well opposite the side you\'re working on, the tire will easily work over the edge of the rim on the other side of the wheel. Kneeling on the tire with the wheel on the ground will naturally hold the bead down. If you need to fight with the tire, the opposing bead is not in the well.
09 Start by inserting two tire irons under the bead. Pull the first one over and tuck the end under the disc if the iron is long enough. If not, kneel on one, then work your way around the first side of the tire taking small bites with the second tire iron.
10 Jimmy says it doesn\'t matter, but Karel says you should only use this end (shown) of a tire iron to remove a tire. This hooked end works great for getting under a tire and lifting it out.
11 One side of the tire is almost completely off, but Jimmy is still holding part of the tire down with his knee. Note that he is using small tire irons. You shouldn\'t need long tire irons to force a tire off and on if you do the job right.
12 Reach in and dig the tube out of the tire. This will be easy or hard depending on how heavy-duty the tube is. Make sure you don\'t flip the tube. Keep it oriented the way it was in the tire as it comes out.
13 Look at the tube for obvious damage like cuts or punctures (without losing track of which side is up). If you find an obvious hole, place the tube on the wheel with the stem lined up with the hole in the rim. That\'ll give you an idea of where to check the tire for damage, nails or thorns.
14 Bunch the old tube up to get the air out of it, since you are packing it out, right? Then feel inside the tire to make sure no obvious pointy things are inside to ruin the new tube. Make sure the rim strip or rim tape is in good shape, too.
15 Life is easier if you get some air in the new tube before you start. Jimmy had a pump, so it was easy. Note that he\'s using a front tube since it\'ll work in either wheel; that way you only need to carry one size with you on the trail.
16 With the tube in and the nut just started on the valve stem, you can get a good start on the tire with your knees. Then start to work the bead on using small bites of tire. Kramer believes the straight end of the tire iron is safest here.
17 The closer you get to having the tire back on, the more important it is to use your knees to hold the opposing side of the tire down in the well of the rim. Note that Jimmy is still taking very small bites with his tire irons.
18 One of the risks here is that the tire will pop over the rim sharply and slam the tip of the tire iron into the inner tube-like this. Most likely this will cut the inner tube, and you\'ll need to start all over with a new tube-if you have one.
19 At the very end of the operation the tire will be at the tightest point. It is best to insert the point of the iron under the tire only enough to catch the tip on the edge of the rim. As you tip the tire iron up, don\'t lift it up past 90 degrees; this will help prevent inadvertent tube pinches.
20 If you are using a heavy-duty tube, it will naturally assume a round shape like this one has. A tube like this HD Bridgestone is difficult to pop in the first place, and it is easier to change without pinching as well.
21 If you\'re using a normal thin tube and it doesn\'t have enough air in it, it is easy to get the partially or uninflated tube stuck beside the rim lock. If airing it up doesn\'t pop it, tightening the rim lock will; so make sure you have the tube clear of the rim lock before you start the tube.
22 You can also get the tube caught under the edge of the tire, and when you inflate the tire that can pop the tube. Or it might hold air, but riding the bike will almost certainly pop it soon after. If you\'re unsure, push the tire to the side and look around the edges.
23 The rubber around the valve stem is thicker than the rest of a thinner tube. For that reason, the tube might get trapped under the edges of the tire as shown. Thread a nut on the stem a few turns then push the stem up. If it doesn\'t move freely, it is caught. Fix it before you proceed.
24 Go ahead and pump up the tire when you\'re sure the tube is not trapped under the edges of the tire. If you see any spot that isn\'t seating right, check to see that the tube hasn\'t gotten trapped again.
25 Install the wheel by sliding it into the swingarm like you took it out. Make sure the wheel spacers are back in the spots they came from. Slip in the axle, stand up the bike and install the chain adjuster plate and axle nut, and you\'re back on the trail.
01 Before you get carried away, take an inventory of your tools and flat repair supplies to make sure you can complete the job in the field. It is a good idea to use your fanny pack to change tires at home, so you know you have everything you need.
02 Start by removing the rear wheel. This is another reason you need to do tire changes at home using your fanny pack tool set. Ryan Orr has just realized that this WR axle was not tightened with a six-inch crescent wrench.
03 With the axle nut off, turn off the fuel and lay the bike down so the axle head is facing up. Pull out the axle, and set it where it won\'t get dirty. Jimmy placed the other hardware on his tool roll to keep track of them and keep them clean.
04 Get the chain off the sprocket, and pull the wheel straight back out of the swingarm. On most bikes the wheel spacers are identical from side to side, but keep track of them. You don\'t want to lose them or mix them up.
05 Look for a flat, fairly firm spot to work. Most riders include a shop towel in their packs; use that under the sprocket to keep dirt out of the axle\'s hole. Loosen the rim lock and remove the valve core from the tube at this time.
06 Jimmy shows the most effective way to use your boots to break the bead on a tire. The longer the tire has been on the rim, the harder it will be to break the bead loose. Using a heel close to the rim maximizes your efforts.
07 The rim has a dip or well in the center to allow you to change tires. The bead of the tire must be down in the well of the rim on one side, so you can work the tire over the rim on the other side. These beads are pushed in but are not down in the well.
08 With the bead of the tire pushed into the well opposite the side you\'re working on, the tire will easily work over the edge of the rim on the other side of the wheel. Kneeling on the tire with the wheel on the ground will naturally hold the bead down. If you need to fight with the tire, the opposing bead is not in the well.
09 Start by inserting two tire irons under the bead. Pull the first one over and tuck the end under the disc if the iron is long enough. If not, kneel on one, then work your way around the first side of the tire taking small bites with the second tire iron.