Perfect Controls - Dr. Dirt - Dirt Rider Magazine

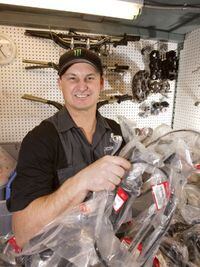
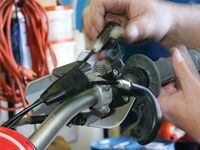
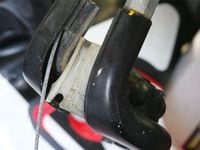
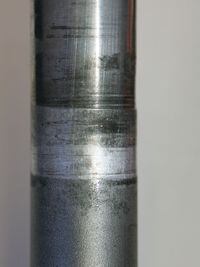
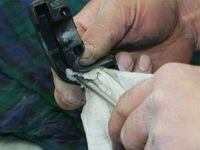
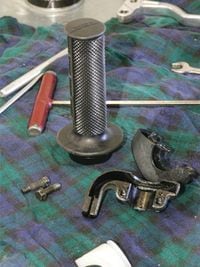
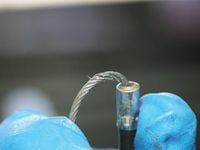
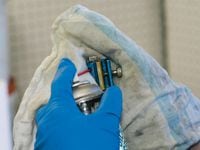
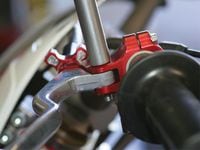
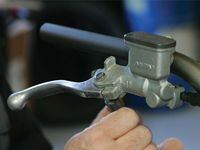
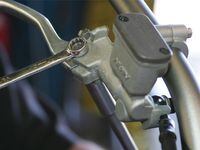
Each time we test a Johnny Campbell replica race bike, every test rider raves how perfect the riding position and control setup are. It helps that JC starts with a Honda, and the company takes extreme pride in its human engineering. But any one of Campbell's bikes rises above the Honda family genes. At least half of the reason is that JC is a good test rider, with a clean and correct riding style. He's just on the tall side of average and sets up his bikes with an eye toward the long run. The other part of the control setup is Precision Concepts technician Eric Siraton and his attention to detail. Ever since Siraton and PC owner Bob Bell started working with Campbell, his bikes have had zero mechanical failures. When we contemplated a story on control efforts, we knew exactly who to call. We borrowed a clean-looking, apparently wellmaintained 2006 Honda CRF450R as a guinea pig. Despite appearing clean and nice, the control efforts were hard and the throttle didn't return cleanly. It just looked like it had been washed thoroughly and a little too often.

01 Siraton started with the throttle, because that\'s the most critical safety issue. It sported a new, wired grip, but it had obviously been slipping. The waffle side of a half-waffle grip shouldn\'t be up like this one.
02 The entire throttle was taken apart and the throttle tube came off the bar in order to inspect all of the individual parts for damage and wear. The cables weren\'t kinked and the housing was intact.
03 There was no unusual wear on this internal cable guide, and the throttle cables weren\'t kinked or frayed, but there was dirt inside the housing where there shouldn\'t be any.
04 A heavy lubricant that looked like anti-seize had been used under the throttle tube, and it had turned sticky and abrasive. The handlebar had this step worn in it. Aluminum can easily break when scored like this.
05 Every part of the throttle was cleaned and not merely spritzed with an aerosol cleaner. Siraton wiped every internal surface in addition to using contact cleaner. He does this level of cleaning for every race!
06 Siraton prefers a new throttle tube with the stock grip glued at the factory. He left the throttle parts soaking with Hondaline silicone spray inside. The tube gets a quick shot inside, then is turned opening down to drain.
07 We had to replace the Renthal bar with a new one, and the surface where the throttle tube rides was treated with Hondaline silicone spray. Siraton likes the silicone since it doesn\'t attract dirt as easily as oil-based lubes.
08 The cables are cleaned and pressure-lubed with silicone spray before being worked in and out to spread the liquid through the housing. Make sure that the throttle cables run parallel and aren\'t twisted.
09 Despite being glued at the factory so it shouldn\'t slip, the grip gets two double wraps of fine stainless steel safety wire as insurance. The wire mostly prevents water from getting under the grip.
10 Almost all of the controls on modern bikes can run dry and feel decent. However, once you lube the pivots, levers and cables, they must be cleaned and lubed regularly. The benefit is smooth action and avoiding wear like this pivot bolt exhibits.
11 Siraton and Campbell swear by the Works Connection Elite perch. It uses this billet lever with a bearing in the pivot point, but washing will eventually ruin the bearing, so it needs to be checked routinely.
12 Once the bearing wears, you can switch to a stock lever, but you get a slightly harder, less-smooth clutch pull and release. These nubs on the front of the lever (arrow) must be filed off to work with the Elite perch.
13 Siraton begins working on the other side of the bar by gluing on a grip. He uses small tubes of Super Glue he buys in an eight-pack at Home Depot. One tube will do two grips. You have to work very fast with the Super Glue.
14 Slide on the grip and spin it a bit to spread the glue, then rapidly position the grip. Siraton uses this pin from the glue to let air and excess glue out. The grip should be ready to use in minutes.
15 The clutch cable showed some fraying,so it was replaced with a new stock cable. Pay attention to the routing. The manual shows it, and Siraton likes the stock routing.
16 Even when starting with a new cable, Siraton lubes it with silicone spray. Just remember, once you start lubing these parts, you must continue to lube them regularly. If you don\'t want the work, replace them often and leave \'em dry!
17 We installed a used perch on this bike, but it allowed Siraton to show how far he disassembles, cleans and lubes the clutch system after every event-sometimes at a WORCS race with different classes, between races!
18 Each part is meticulously cleaned before assembly. As the perch goes together, moving parts get lubed. This spring detent for the clutch quick adjust gets a dab of grease to allow it to work smoothly.
19 The Elite perch must use a Works Connection boot instead of the stocker, so it is siliconed up to let it slide over the cable easier. You can warm the boot a little if you\'re working in the cold.
20 Since this is a \"weekend warrior\" bike, a new, modified stock lever was used with a tiny dab of grease on the pivot bolt. All excess is wiped away to keep it from attracting dirt.
21 We finally moved to the brake system (shown without the throttle to make it easier to see). Siraton started by removing the old, bent stock lever and going through his cleaning ritual as with the other components.
22 Like the clutch side, the brake pivot bolt was dry and scored from running dry and being overwashed. This bolt and the lever will be replaced with new parts. Aftermarket pivot bolts won\'t have the smooth finish of the stocker.
23 You\'ll need to save the adjustable actuator bolt; on some bikes it\'s secured with a tiny circlip. You need to remove that clip before removing the bolt. Failure to do so will destroy the lever threads and possibly the bolt threads.
24 The lever return spring is cleaned and treated to a grease bath. This aids lever feel and the sticky grease helps the spring stay in place during assembly.
25 The surface of the stock pivot bolt is chromed for longer life and smoother action. Use a dab of grease for optimum feel, but run it dry or with a powder lube like graphite if you aren\'t willing to disassemble and clean it regularly.
26 Notice how clean all the parts of the brake are before final assembly. The master cylinder plunger gets a dab of grease before the lever is installed.
27 The pivot threads into the perch, so the bolt is merely snugged up. Hold the bolt while you install and tighten the locknut. That keeps you from pulling the ears of the master cylinder into the lever by overtightening it.
28 Siraton carefully measures from bar clamp to the end of the bar on both sides to make sure the grips are at exactly the same distance from the clamp. The throttle end is one layer thicker, so the bar may be slightly offset to equalize the grip distance.
29 The cables and wires are carefully routed and secured with electrical tape or the stock reusable cable ties. Run the kill button wire to the bottom of the handlebar to prevent tiedown damage.
30 Siraton\'s final tip is to cover the joint in the throttle halves with tape. This is generally only an issue in sand or silt, but it also helps keep water out of the throttle housing while washing.
01 Siraton started with the throttle, because that\'s the most critical safety issue. It sported a new, wired grip, but it had obviously been slipping. The waffle side of a half-waffle grip shouldn\'t be up like this one.
02 The entire throttle was taken apart and the throttle tube came off the bar in order to inspect all of the individual parts for damage and wear. The cables weren\'t kinked and the housing was intact.
03 There was no unusual wear on this internal cable guide, and the throttle cables weren\'t kinked or frayed, but there was dirt inside the housing where there shouldn\'t be any.
04 A heavy lubricant that looked like anti-seize had been used under the throttle tube, and it had turned sticky and abrasive. The handlebar had this step worn in it. Aluminum can easily break when scored like this.
05 Every part of the throttle was cleaned and not merely spritzed with an aerosol cleaner. Siraton wiped every internal surface in addition to using contact cleaner. He does this level of cleaning for every race!
06 Siraton prefers a new throttle tube with the stock grip glued at the factory. He left the throttle parts soaking with Hondaline silicone spray inside. The tube gets a quick shot inside, then is turned opening down to drain.
07 We had to replace the Renthal bar with a new one, and the surface where the throttle tube rides was treated with Hondaline silicone spray. Siraton likes the silicone since it doesn\'t attract dirt as easily as oil-based lubes.
08 The cables are cleaned and pressure-lubed with silicone spray before being worked in and out to spread the liquid through the housing. Make sure that the throttle cables run parallel and aren\'t twisted.
09 Despite being glued at the factory so it shouldn\'t slip, the grip gets two double wraps of fine stainless steel safety wire as insurance. The wire mostly prevents water from getting under the grip.
10 Almost all of the controls on modern bikes can run dry and feel decent. However, once you lube the pivots, levers and cables, they must be cleaned and lubed regularly. The benefit is smooth action and avoiding wear like this pivot bolt exhibits.
11 Siraton and Campbell swear by the Works Connection Elite perch. It uses this billet lever with a bearing in the pivot point, but washing will eventually ruin the bearing, so it needs to be checked routinely.
12 Once the bearing wears, you can switch to a stock lever, but you get a slightly harder, less-smooth clutch pull and release. These nubs on the front of the lever (arrow) must be filed off to work with the Elite perch.
13 Siraton begins working on the other side of the bar by gluing on a grip. He uses small tubes of Super Glue he buys in an eight-pack at Home Depot. One tube will do two grips. You have to work very fast with the Super Glue.
14 Slide on the grip and spin it a bit to spread the glue, then rapidly position the grip. Siraton uses this pin from the glue to let air and excess glue out. The grip should be ready to use in minutes.
15 The clutch cable showed some fraying,so it was replaced with a new stock cable. Pay attention to the routing. The manual shows it, and Siraton likes the stock routing.