
Tech How-To
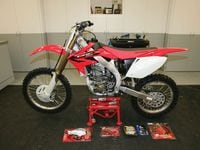
Just as you wouldn't go wring out the motor before break-in, you shouldn't ride a new bike without prepping it. If you do, you may not pay the price after the first few rides, but the tab will come due. When the bike is showroom clean the basic prep and setup takes less than half the time it would if the bike were dirty. So bite the bullet and get it done.While you're handling the basic greasing and checking, spending a few dollars wisely can save you big bucks later in the moto or further down the trail. This bike is one of those leftover '06 bargains available at the moment. Even though it isn't an '08, it's brand-new. Every step we took with this bike applies to any year or brand, but take the time to learn about the brand you choose. Different bikes may need different weaknesses taken care of. This Honda didn't require the bolts holding the plastic to be thread-locked, but some brands might. The idea is to give your bike the prep it needs. Off-road prep would be more dedicated, and it would include flat protection and bike protection items. The key is to take care of any issues before you get the bill for ignoring it.01
Starting with a new, clean machine makes the job of prepping the bike easier and faster. If you plan on adding protective products or making changes, be sure you have the products, chemicals and parts that you need before beginning.02
We decided to dive in head first. We removed all the parts that needed grease before we began putting things back together. The key items were the steering head, linkage and swingarm pivots.03
Steering head bearings look like car wheel bearings but face different problems. You can pack them solid with grease, but the main point is to immunize them from water that will get to them thanks to the prevalence of pressure washers.04
When the linkage and swingarm pivot bearings are all clean and moisture-free, they just need good grease. Slide the inner collar over and grease one side of the bearing, then slide it to the other side and grease it. Easy and clean.05
After lubing the bearings, we installed and torqued the swingarm and linkage. We then removed the chain adjuster bolts and put anti-seize on the threads to avoid having corrosion weld them into the swingarm. Repeat this step often.06
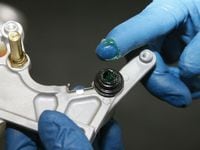
The brake pedal pivot has no bearing and the pedal itself is generally fairly soft aluminum. Grease the pivot and bolt well to prevent the pivot from wearing prematurely.07
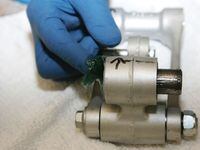
The brake pads must be removed to pull the brake calipers from their caliper mounts. Get some grease down inside these holes with the rubber boots sealing them. Make sure to clean up any you slopped on the outside.08
You'll also need grease on these pins. The caliper is supposed to float on these pins to center itself over the disc. If the pins dry out, the caliper won't float, and it will generate a lot more heat than it should have to deal with.09
Make sure the rubber boots are seated when you put the caliper back on the mount. Use a small amount of anti-seize on the threads of the brake pad retaining pins. You don't normally remove the pin that often, and it can corrode to the caliper.10
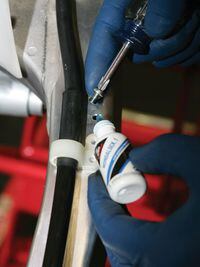
To remove the swingarm we had to unscrew these hose guides from it. The screws holding the guides are small and don't engage many threads, so we used a thread-locking compound on them.11
This is the perfect time to install SealSavers (www.sealsavers.com) or Shock Sox (www.bermmx.com) to protect the fork seals. The front tire throws rocks at the back of the fork leg and the dings ruin seals. These products triple seal life.12
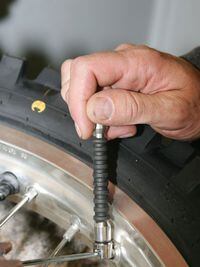
Most bike-prep services don't include tightening the spokes. This Honda had spoke tension that was fine, but going a little tighter doesn't hurt. Work around the wheel, making adjustments no greater than 1/4 turn at a time. We went around each wheel twice.13
The owner of this bike is stepping up from an older CRF450R; knowing he wanted lower gearing, he slipped on a Sunline 49-tooth sprocket to keep the chain and sprocket wear consistent.14
When the wheels go back on, the axles need a light coating of grease. The axles don't turn inside of the wheel, so the grease isn't for lubrication. It's to prevent the axle from rusting to the wheel bearings.15
It doesn't matter whether you use a bike for motocross or off-road. If you're buying your own sprockets, use an O-ring chain. Installing an O-ring chain, like this Sunline unit, while the sprockets are new will greatly extend chain and sprocket life.16
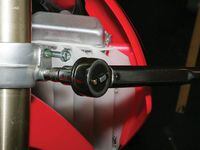
When the fork tubes go back in the clamps, the bolts should get grease or anti-seize on the threads. Then follow the torque specifications in the manual. The Honda specifies 19 Newton meters for the fork and axle clamp bolts.17
This will be an all-around bike, but even if you only ride moto, hand guards are a good idea to minimize roost abuse to your hands. Sunline, Acerbis and Cycra all make guards that are light and mount easily.18
Staying with the same brand and model of bike let this owner save some cash by swapping his triple clamp and oversize handlebar over to the new bike. He installed push-button fork bleeders at the same time.19
An hourmeter is almost indispensable for a new four-stroke. We found that we save money by not changing the oil too often. It takes longer for the hours to add up than you'd think. Recording the stock suspension settings is a great help.20
Since this bike will see some off-road use, it was necessary to make sure it was legal. The owner researched the options and he felt the Pro Moto Billet end-cap would best suit his needs and budget. It installed cleanly and easily.21
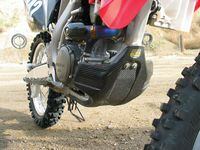
Another potential savings is a glide plate (motocross) or a full skid plate (off-road). Current lightweight engine covers are more prone to damage than ever. Put better protection on while the frame tubes are still straight and the cases are whole.22
Radiators are the Achilles' heel of modern bikes, but there are clever innovations in radiator bracing from complete cages to light, one-sided units. We prefer maximum protection that allows use of the stock air-guide louvers.23
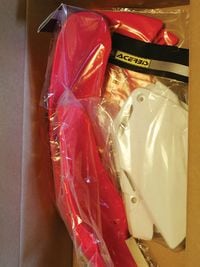
Some riders pull off all of the stock plastic and replace it with a complete aftermarket kit like this one from Acerbis (www.acerbis.com). When they sell the bike they put the new stock parts back on.24
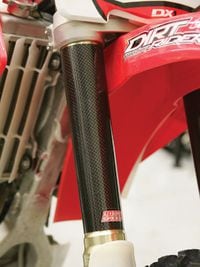
For off-road or rocky motocross tracks, an upper fork protector can save big bucks. These Light Speed (www.lightspeedperf.com) units are as light as air. Dicks Racing (www.dicksracing.com) has super-tough ABS units for more extreme protection.


/cloudfront-us-east-1.images.arcpublishing.com/octane/XQORS527YFFT3MVI326EOEYJUI.jpg)
/cloudfront-us-east-1.images.arcpublishing.com/octane/TVDPP3TGMZHODFXASIFUM2KD34.jpg)
/cloudfront-us-east-1.images.arcpublishing.com/octane/EWDMR3DDTBBQPI7DQVZCLMRFAE.jpg)
/cloudfront-us-east-1.images.arcpublishing.com/octane/4XHHLVOUKFE3PDSWNSV4JJMGOE.jpg)
/cloudfront-us-east-1.images.arcpublishing.com/octane/5RLI3NQKQJA3LKKCQHRXQFTL6Q.jpg)
/cloudfront-us-east-1.images.arcpublishing.com/octane/3QCYJCI2RNBENIRWAKEOEKHFUM.jpg)
/cloudfront-us-east-1.images.arcpublishing.com/octane/UZHF7KAE7BFN7KU734ER7PPP3Q.jpg)
/cloudfront-us-east-1.images.arcpublishing.com/octane/XJFFFMRN6VEZ7CDNAGKWVPC3H4.jpg)
/cloudfront-us-east-1.images.arcpublishing.com/octane/RMC3CHWSHFAUJA2WJ2FVG4NBOA.jpg)
/cloudfront-us-east-1.images.arcpublishing.com/octane/WXEZV4WAYBERFKSRE5M7GQBW7A.jpg)
/cloudfront-us-east-1.images.arcpublishing.com/octane/LO3PZVGICFGJZBNUA2ORUSAUSE.jpg)
/cloudfront-us-east-1.images.arcpublishing.com/octane/UFHLTNOXLVARVLZV32M6ZJZV4Y.jpg)
/cloudfront-us-east-1.images.arcpublishing.com/octane/CTSWNU7SNNCC3LWB2KATYZ5AXY.jpg)
/cloudfront-us-east-1.images.arcpublishing.com/octane/IBNGAQWHJJF4TKSIQT54MTWRYQ.jpg)
/cloudfront-us-east-1.images.arcpublishing.com/octane/EAEWHFARGVGHFH4N4BDOSNBJSU.jpg)
/cloudfront-us-east-1.images.arcpublishing.com/octane/AZ7H35TQSZDKZCVM4S6CHERQEU.jpg)
/cloudfront-us-east-1.images.arcpublishing.com/octane/GYMIU7SMN5CWHP6QLFR6MVKEBU.jpg)
/cloudfront-us-east-1.images.arcpublishing.com/octane/B3CX7C4BFFCKBLDWHPQFACBH2E.jpg)
/cloudfront-us-east-1.images.arcpublishing.com/octane/6EIBG7NN4BH4FKDBCPCTLQL6FU.jpg)
/cloudfront-us-east-1.images.arcpublishing.com/octane/3RBI4ZG5NNBCTEUK7MWMKVZ5BE.jpg)
/cloudfront-us-east-1.images.arcpublishing.com/octane/3QKLYI2BWVAMRNNFC5KCGUYRAU.jpg)
/cloudfront-us-east-1.images.arcpublishing.com/octane/B7ITEVP2MRGLXM37KQURRKCG3E.jpg)
/cloudfront-us-east-1.images.arcpublishing.com/octane/BMDGOMSLGFF7XDLBL5DVCTON6Y.jpg)
/cloudfront-us-east-1.images.arcpublishing.com/octane/AEPPASNAAJGXVLAXAH5RF3BDNY.jpg)