Dirt Bike Valve Job and Reassembly Part 2 - Dr. Dirt - Dirt Rider Magazine

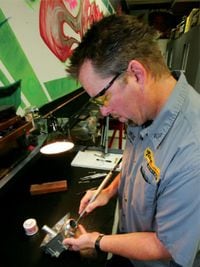
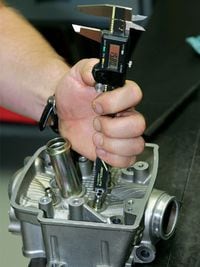
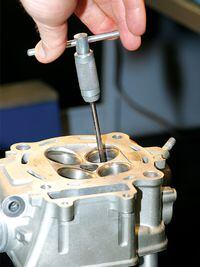
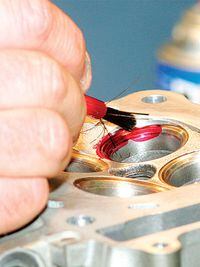
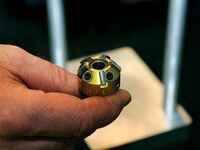
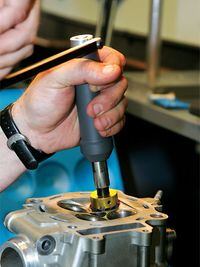
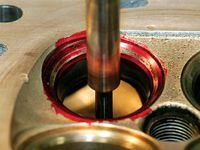
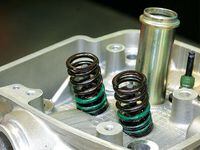
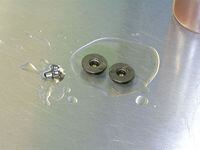
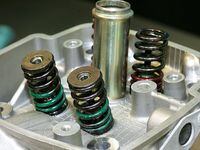
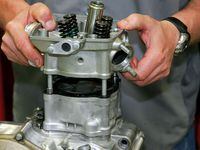
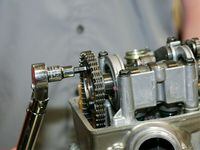
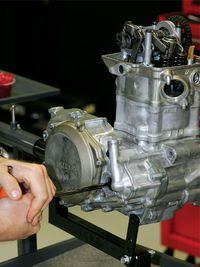
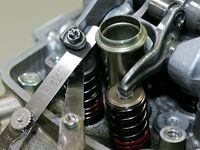
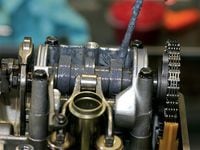
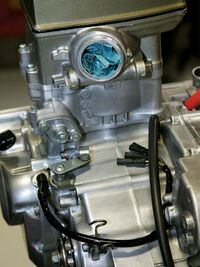
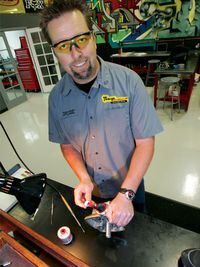
In DR's previous look at a CRF450R head, Tokyo Mods' Ron Wood demonstrated tearing down the top end and prepping it for new valve components. Now we follow Wood's talented hands and pick his brain as he cuts new angles for the valve seats and assembles the valve train like the pro he is. Wood maintains that a correctly assembled valve train is the key to performance and engine longevity. In particular, he insists that the valve guides need to have a snug fit. That means installing new guides and reaming them to the proper size. Naturally, the valve seals are replaced as well. Of all the parts used in this rebuild, the valves are the most expensive. Yes, the little parts do add up, but since they all contribute to the efficiency or life of the valves, it's more prudent in the long run to replace the lot. We are using a Honda head for this story, but the basics are the same for any modern head.As always, these pages do not replace a shop manual but should act as an aid, revealing tips and explanations you won't find in the factory guidebook.

Before starting assembly, the head must be thoroughly cleaned with solvent, soft-bristled brushes and Scotch-Brite pads until there is no oil or carbon left. Clean the head well with contact cleaner until there is no telltale solvent smell. Let the cleaner evaporate thoroughly while you get organized. You\'ll need to have new guides sitting in the freezer inside a sealed plastic bag as well as the proper driver to install the new guides. Wood uses a trick stand, but you\'ll most likely need to have two-by-fours arranged that will support the head without damaging the gasket surfaces. Once everything is ready, heat the head to 300 degrees in an oven or on a hot plate. Make sure you have the proper gloves to handle hot metal. You\'ll need to work fairly quickly once you get going.
Use a bit of extreme pressure lubricant on the leading edge of the guide. It will help the guide go in without taking any metal out of the guide bore.
Use the driver to install the guides. It is not merely a punch. It has a tip that slips into the guide itself, so it drives the guide without mushrooming the opening. This operation is much more risky when using a normal flat punch. Wood machined this outer sleeve, then marked the punch so he can see exactly how deep to drive in the guides.
You will need to measure as you go to make sure you attain the correct depth. The manual has the specs for the guide height.
This shot provides a good look at how clean Tokyo Mods got the head casting before beginning the guide work. The next step is to ream the new valve guides to size. Since this Honda has different diameter stems for the intake and exhaust valves, two different reaming tools are required.
After the guides are reamed, it is time to use a machinist\'s dye on the valve seats. The color lets you see where and how much material is being removed. We\'ve heard of using a permanent marker for this task.
This is the 45-degree cutting head from a Neway valve seat cutting set. It makes the initial and widest cut, and this angle will be where the new valve seals and transfers heat.
The Neway set uses a precision hand crank to make the cuts. The tool has a shaft that slides into the valve guide to ensure the cutting head stays in place and cuts properly.
After the initial cut, the remaining machinist dye shows the seat was no longer shaped precisely and the hole was no longer perfectly round thanks to the worn guides letting the valve move around.
The completed 45-degree cut is clean, wide and perfectly round. A new valve will seat very well to this surface.
In this shot the outer 35-degree cut has been made. Note that the 45-degree cut has been narrowed somewhat.
With the final, deepest 55-degree cut made, this is your proverbial three-angle performance valve job. When a head is ported, mismatches like the one pointed out by the arrow are blended in. Tokyo Mods also offers porting.
Here is the completed head with all four seats cut and ready for fresh valves. We cleaned it, then colored in each angle of the cut seat to make it easier to see.
These are the rest of the new parts that will go into the rebuilt head. Most Tokyo Mods customers are looking for maximum performance, so most choose to replace the valves with stock Honda valves. Since this engine sees a lot of off-road use, we chose to use stainless steel valves from Faction MX for longer valve life off-road. The stainless valves require their own matched valve springs.
To lubricate parts as he goes along, Wood uses a small squirt bottle of oil, and it gets a workout! Lube the spring seat area and the top of the guides with engine oil. Oil is your friend. Use plenty of it.
Set the valve spring seats on the guides, and oil them.
Again, since this model has different size valve stems, the seals are different and must go on the correct pair of valve guides.
In this case, the brown ones go on the intakes. You can tell them apart with help from the manual or by using the part numbers. The stem seals also get oiled.
Honda recommends a molybdenum (moly) paste on the valve stems, but Wood uses moly paste mixed with engine oil. The moly is to prevent damage at start-up and during break-in.
With the new seals, the valves pop into the head and they stay put nicely. Wood popped in all four valves before installing the springs.
Oil both ends of the new valve springs before installing them. All valve springs are assembled with the tighter ends of the coil down. The other end is lighter, so it is better to have it up. The ends are usually painted for identification. Honda springs are painted on top; the springs for the stainless valves we used are painted on the bottom.
Before starting assembly, the head must be thoroughly cleaned with solvent, soft-bristled brushes and Scotch-Brite pads until there is no oil or carbon left. Clean the head well with contact cleaner until there is no telltale solvent smell. Let the cleaner evaporate thoroughly while you get organized. You\'ll need to have new guides sitting in the freezer inside a sealed plastic bag as well as the proper driver to install the new guides. Wood uses a trick stand, but you\'ll most likely need to have two-by-fours arranged that will support the head without damaging the gasket surfaces. Once everything is ready, heat the head to 300 degrees in an oven or on a hot plate. Make sure you have the proper gloves to handle hot metal. You\'ll need to work fairly quickly once you get going.
Use a bit of extreme pressure lubricant on the leading edge of the guide. It will help the guide go in without taking any metal out of the guide bore.
Use the driver to install the guides. It is not merely a punch. It has a tip that slips into the guide itself, so it drives the guide without mushrooming the opening. This operation is much more risky when using a normal flat punch. Wood machined this outer sleeve, then marked the punch so he can see exactly how deep to drive in the guides.
You will need to measure as you go to make sure you attain the correct depth. The manual has the specs for the guide height.
This shot provides a good look at how clean Tokyo Mods got the head casting before beginning the guide work. The next step is to ream the new valve guides to size. Since this Honda has different diameter stems for the intake and exhaust valves, two different reaming tools are required.
After the guides are reamed, it is time to use a machinist\'s dye on the valve seats. The color lets you see where and how much material is being removed. We\'ve heard of using a permanent marker for this task.
This is the 45-degree cutting head from a Neway valve seat cutting set. It makes the initial and widest cut, and this angle will be where the new valve seals and transfers heat.
The Neway set uses a precision hand crank to make the cuts. The tool has a shaft that slides into the valve guide to ensure the cutting head stays in place and cuts properly.
After the initial cut, the remaining machinist dye shows the seat was no longer shaped precisely and the hole was no longer perfectly round thanks to the worn guides letting the valve move around.
Oil the spring retainers and the valve keepers. The valve keepers are called cotters, and you should never, ever reuse cotters. They break in to fit the valve, they are cheap and they cause a catastrophe if they let go.
Assemble the keepers (cotters) into the retainers before setting them on top of the springs. The oil is for start-up lubrication, but it also helps to hold the cotters in the valve-spring retainers.
Compress the springs carefully, and just deep enough so the cotters can drop right into place. Then back off the compressor and they should lock in. The oil really helps the parts ease together.
Now the head is ready to have a new gasket mounted and go back on the engine.
The washers that hold the head down are shaped slightly differently. The wider side should go against the head, and the nut rides against the smaller side. You should install the head, set the washers on the studs, then torque the nuts to the proper spec. Work up to the torque setting moving in a cross or X pattern as you tighten. Install the two 6mm bolts on the side of the head outside the cam-chain case.
Since the seats have been cut and new valves and tappets have been installed, you\'ll have to guess on the shims you need. Start with two sizes smaller than the shims you took out. A small scrap chart like this will help keep things organized and minimize mistakes.
Before you can check the valve clearances, the cam carrier bolts must be tightened to the specified torque reading. The cam sprocket bolts need to have the correct torque as well. The crank and cam must be timed to each other as well. The dot on the crank drive gear (seen through the round inspection cover on the clutch case) should line up with the arrow cast on the outside of the inspection hole.
Make sure the cam lobes are pointing toward the intake and the lines on the front of the cam sprocket are aligned with the arrows behind the sprocket. We marked the arrow you can see here in red.
Once you are sure you have the valve clearances set and the cam timed correctly to the crank, install the cam-chain tensioner and turn the engine over several revolutions using a T-handle Allen in the bolt in the end of the crank. Listen and feel for anything that doesn\'t seem right. Now is the time to make changes!
Once the cam timing and valve clearances check out correctly, it is time to set the auto-decompressor clearance. Use a feeler gauge that will take all the clearance out of the rocker arm. It should be the same feeler gauge with which you set the valve clearance. Leave that feeler gauge in place, then slip in a 0.010-inch feeler gauge and check the decompressor lever. The clearance should be .010 inch. Adjust the clearance if it is off.
When all the settings are right on, coat the cam lobes with the moly paste combo to avoid wear on start-up.
Button up the engine, and plug the ports to keep junk out until the pipe and carburetor are mounted. With the motor back in the bike and broken in, starting is back to easy and consistent, and the bike runs clean and strong. We can\'t even tell there are stainless valves in the engine. We\'ll keep an eye on the hourmeter and report our results.
Tokyo Mods\' Ron Wood (www.tokyomods.com) is a former factory Honda and Kawasaki race team mechanic, but he has also worked for Toyota building race motors. When Honda began playing with four-stroke motocross machines, Wood left Toyota and took his four-stroke expertise back to Honda. He was in charge of engine development for Ryan Hughes in 2001 when Hughes had the only CRF450R in the country. The man knows four-strokes.
Before starting assembly, the head must be thoroughly cleaned with solvent, soft-bristled brushes and Scotch-Brite pads until there is no oil or carbon left. Clean the head well with contact cleaner until there is no telltale solvent smell. Let the cleaner evaporate thoroughly while you get organized. You\'ll need to have new guides sitting in the freezer inside a sealed plastic bag as well as the proper driver to install the new guides. Wood uses a trick stand, but you\'ll most likely need to have two-by-fours arranged that will support the head without damaging the gasket surfaces. Once everything is ready, heat the head to 300 degrees in an oven or on a hot plate. Make sure you have the proper gloves to handle hot metal. You\'ll need to work fairly quickly once you get going.
Use a bit of extreme pressure lubricant on the leading edge of the guide. It will help the guide go in without taking any metal out of the guide bore.
Use the driver to install the guides. It is not merely a punch. It has a tip that slips into the guide itself, so it drives the guide without mushrooming the opening. This operation is much more risky when using a normal flat punch. Wood machined this outer sleeve, then marked the punch so he can see exactly how deep to drive in the guides.
You will need to measure as you go to make sure you attain the correct depth. The manual has the specs for the guide height.
This shot provides a good look at how clean Tokyo Mods got the head casting before beginning the guide work. The next step is to ream the new valve guides to size. Since this Honda has different diameter stems for the intake and exhaust valves, two different reaming tools are required.
After the guides are reamed, it is time to use a machinist\'s dye on the valve seats. The color lets you see where and how much material is being removed. We\'ve heard of using a permanent marker for this task.
This is the 45-degree cutting head from a Neway valve seat cutting set. It makes the initial and widest cut, and this angle will be where the new valve seals and transfers heat.
The Neway set uses a precision hand crank to make the cuts. The tool has a shaft that slides into the valve guide to ensure the cutting head stays in place and cuts properly.
After the initial cut, the remaining machinist dye shows the seat was no longer shaped precisely and the hole was no longer perfectly round thanks to the worn guides letting the valve move around.