This month we take you on a tour of the KTM Racing Four-Stroke (RFS) motor, specifically the top end. KTM's Tom Moen has rebuilt a few and knows the ins and outs to make this job as painless as possible. Relatively simple in design, it has only one fly complicating its design ointment: an endless cam chain that wraps in and out of holes to prevent it from coming apart without breaking the chain. And it requires a special KTM tool too (part No. 590.29.020.000, $138.49); pricey for all but the tool aficionado.1. Remove the seat, tank, sidepanels and any skid plate you may have, and take the headpipe off the bike.2. Empty the oil through the drain plug and pull off the ignition sidecover. This will let you turn over the motor more easily and allow you to get out the last of the motor oil.3. Empty the coolant using the lower drain hole on the front of the cylinder.4. Remove the radiators; first the left side then the right side, with the hoses still attached to the right radiator.5. On to the carb. Disconnect the TPS wire before you loosen the clamps. The trick is to push the carb back into the airbox boot and remove from the right side, so you don't have to undo the throttle cables.6. Remove the spark plug cap and blow out the hole with air (you don't need to remove the spark plug). Take off the gas-tank mounts from the frame. Remove the decompression cable by loosening the 8mm adjuster and lifting out the cable.7. The external oil line comes off by removing the two banjo bolts with a 12mm wrench. Remember, the longer bolt is from the centercase and the shorter one goes in the head.8. Next remove the valve-adjustment covers and water-pump cover bolts using an 8mm.9a. Taking the cam-chain tensioner out—first, take the spring cap nut off the back and remove the spring to get the tension off the adjuster. Then undo the two 8mm bolts and carefully pull out the tensioner.9b. Examine this tensioner very carefully as it will indicate cam chain life. Basically, if there isn't much adjustment remaining (two clicks left is as bad as you'd ever want to find this), the chain should be replaced. And if the cam chain is this loose, it can retard cam timing 4 degrees.10. Take off the rocker-arm cover, and make sure to mark all of the bolts as they are different lengths. If you get messed up, the KTM owner's manual shows which one goes where.11. Set the bike to TDC on the compression stroke, so the cam lobes are down. Now is the time to break the cam chain with the special KTM tool. Be very careful not to drop the chain pin into the motor. If you are not going to replace the cam chain, remove the whole link so you don't have to do it upon reassembly. Also, check the cam bearings and always replace the water-pump O-rings and seals.12. Loosen the three 6mm (8mm head) bolts—one in the front, one in the back and one on the left side—then the four 13mm bolts. There are washers on all four larger bolts and one on the smaller bolt by the water pump. Finally, remove the head.13. Remove the cylinder and take the piston off the rod, again, being careful not to drop anything into the case.14. Check the ring end gap and piston clearance with the chart as a guideline (on next page). Now would be a good time to disassemble the head to check the state of the valves. Look especially for any intake valve cupping.15. For the cam and water-pump assembly, its gasket support and housing has a seal inside where you can use a big socket to stabilize the housing and punch out the seal, because you can't clamp on the seal housing. To press in the new seal, you can use a vise with a protector.16. Clean up the valves and head, using a wire wheel on the valves and a Scotch-Brite pad and a razor blade on the head. You can use a felt tip pen to check the valves' sealing. Do not lap the valves as it will take off any coating.17. Put in the new valve-guide seals.18. Replace the valves in the head one at a time. Put a little grease on the valve lip to hold the retainer clips in place. The KTM valve holding tool makes this job much easier. On some 2000 models it is suggested that you replace the aluminum retainers with steel ones and upgrade to newer springs.19. Make sure all gasket surfaces are clean, and put on the base gasket, making sure it is the right way by checking its thickness at the cam tunnel.20. Roll in the circlips and prepare for their flinging off into space or, even worse, into the bottom end of the motor. Fill the gap with a clean shop rag or paper towel to prevent this from happening.21. Slide the cylinder onto the piston. A ring compressor (shown here) makes this much easier.22. Put a zip-tie through the end of the cam chain to extend your reach and get it through the cylinder.23. As you slide the cylinder down, make sure the locating pins line up.24. Install the head gasket with the word "alto" facing up and then put on the head. Install the stud with assembly lube or grease on the threads to get a consistent torque reading. Start with about 10 foot-pounds, and increase to 35 foot-pounds in a crisscross pattern with a good torque wrench.25. Put in the three smaller head bolts, and remember the one with the washer goes by the water pump.26. Place the cam in the head and make sure the cam-sprocket bolts are tightened with red Loctite. Set it so the lobes are down and have the piston at TDC. Wrap the cam chain up over the sprocket.27. Now you'll replace the link with a new cam-chain master link using the KTM tool.28. You use the press plate first to press the master link together.29. Then you crimp the link pins with the same tool.30. At this time you should make sure the seal head on the cam is pushed in all the way and is flush with the casting in the water-pump housing, or you will have an oil leak later.31. Use Three Bond 1104 or Yamabond on the rocker cover and be ready to move quickly! If you take too long, the sealer won't allow the cover to snug down and you could have problems with the O-rings on the water-pump seal. It is a good idea to preplace the center rocker-arm cover bolt as it can be tough to get in once the cover is in place.32. You will have to set the side-to-side rocker-arm end play by pressing on the rocker-arm shaft bushing and tightening the rocker-arm cover bolt that rides above it. When the desired play is achieved (0.020 inch), snug down the bolt above it.33. Now is the time to set the valve lash. The recommended amount is 0.005-0.004 inch. A position closer to 0.004 inch on the kickstart bikes is better as the auto decompression lifts the valve a little earlier.34. Install the cam-chain tensioner with a new gasket and the ratcheting plunger compressed all the way in. Then install the spring backed up by the bolt holding it in.35. Now for the water pump and its cover. When you install the pin, you should be able to check that the cam timing is correct if the pin is lined up with the split of the cases.36. If it is good, install the impeller with the clip and put on the cover with a new gasket.37. Put on the valve-adjustment covers. Sometimes you can get away with reusing the gaskets.38. Reinstall the flywheel if it was removed. Torque it to 35 foot-pounds. Mount the oil line. The shorter bolt goes on top of the head.39. Zip-tie the ignition wires together but not to the oil line, as it can get too hot and melt the wires.40. If you used it, make sure the TDC locator bolt is removed! Place the thick washer back on the bolt and reinstall.41. Install the decompression lever with 10-15mm of lever-travel freeplay, but make sure it still opens up the valve when pulled. Replace the spark plug cap.42. Replace the carb from the right side, tighten the clamps and properly route the hoses.43. Install the gas-tank mounts.44. Bolt on the headpipe. On the late-model bikes with two-into-one headers, seal the pipe-to-head junction with red high-temp silicone.45. Put back on the radiators; the right side with all the hoses first, then the left. Check all the connections before adding coolant.46. Use the coolant bleed from the right side of the head to get out all of the air.47. Pour about 1200cc of oil into the engine (a little less if you haven't replaced the filters).48. Put on your seat, gas tank and sidepanels and smile if your bike starts, as Tom Moen does here.Parts List
Cam-chain tensioner gasket
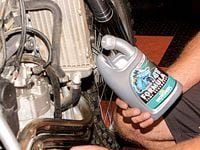
Water-pump gasket
Ignition-cover gasket
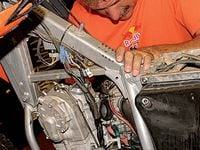
Base gasket
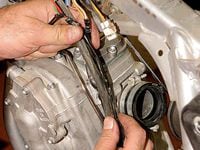
Piston kit
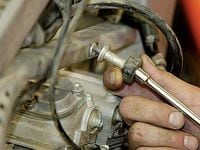
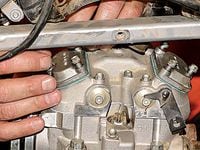
Two intake valves
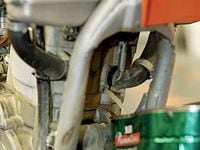
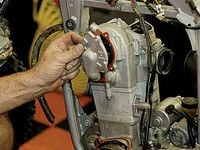
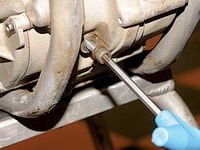
Four valve-guide seals
Cam chain with master link
Two water-pump seals
Cam bearings
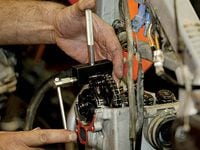
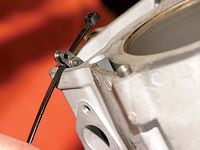
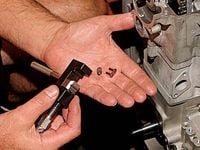
Bolt-on cam replaced with a punched cam sprocket

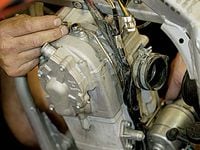
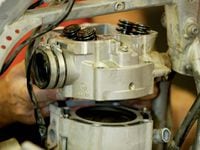
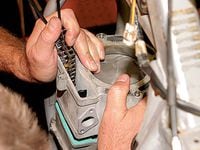


/cloudfront-us-east-1.images.arcpublishing.com/octane/VSK246VVRRDMBNQU7B2NTNY6AE.jpg)
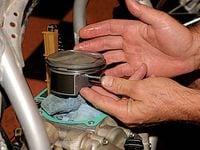
/cloudfront-us-east-1.images.arcpublishing.com/octane/CG64RRFAYRENNAP2AA22T2LSJY.jpg)
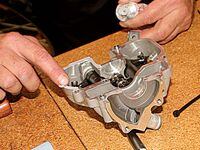
/cloudfront-us-east-1.images.arcpublishing.com/octane/IKZSRLBWMRDORMORBXSISL4D6M.jpg)
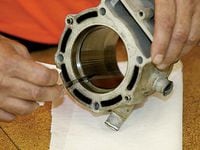
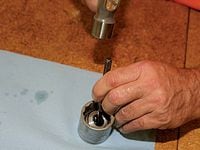
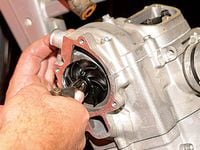
/cloudfront-us-east-1.images.arcpublishing.com/octane/BJLVRPJSDFC3ZLPMW3LYYHMPZE.jpg)
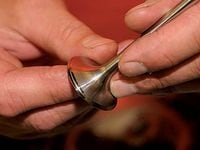
/cloudfront-us-east-1.images.arcpublishing.com/octane/RQW2RFU4MJDYRPVFJNW362SEXU.jpg)
/cloudfront-us-east-1.images.arcpublishing.com/octane/CGQDU7HEEBBWBLF6SMXCJIW7DI.jpg)
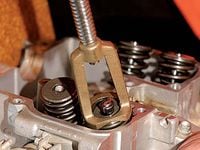
/cloudfront-us-east-1.images.arcpublishing.com/octane/B35XXACE4ZGU5BWSEMEFUL6SN4.jpg)
/cloudfront-us-east-1.images.arcpublishing.com/octane/TDSGY4VSSRC4LP6PYXP62U236Y.jpg)
/cloudfront-us-east-1.images.arcpublishing.com/octane/4YWNAG64EZF63AQI3VL7ANERSY.jpg)
/cloudfront-us-east-1.images.arcpublishing.com/octane/QFQQG7ZZKFB5VC7C7B5PTOCJ2E.jpg)
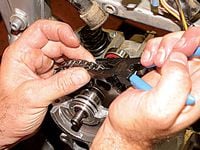
/cloudfront-us-east-1.images.arcpublishing.com/octane/F6OD34H47ZER7KMC5RKMRWKU64.jpg)
/cloudfront-us-east-1.images.arcpublishing.com/octane/OL2BBABYPRGLLA34ONSWUVN7RQ.jpg)
/cloudfront-us-east-1.images.arcpublishing.com/octane/SKD5PT7E4RHABPEPPXAFQRPOCE.jpg)
/cloudfront-us-east-1.images.arcpublishing.com/octane/XIGZAPB55ZGTLO4QKFGTLMDHGQ.jpg)
/cloudfront-us-east-1.images.arcpublishing.com/octane/37HWZLXD45BQXJ66M6F5HCWNBI.jpg)
/cloudfront-us-east-1.images.arcpublishing.com/octane/ZX4T6QDGRVA2JIRKQGDTKD7GQY.jpg)
/cloudfront-us-east-1.images.arcpublishing.com/octane/BSZF6XDGO5FNBNRPXLO6JPFGEE.jpg)
/cloudfront-us-east-1.images.arcpublishing.com/octane/TXKVIQGGGJF7DPAKWHPUWXHOS4.jpg)
/cloudfront-us-east-1.images.arcpublishing.com/octane/F6MQF7FXH5BSTIFA7QJTZCQDXM.jpg)
/cloudfront-us-east-1.images.arcpublishing.com/octane/R5TMRJ5BOJEAJK5FDIE7BBIKGM.jpg)
/cloudfront-us-east-1.images.arcpublishing.com/octane/KXS2F7SYWNGEHMRUY2CYVTMHC4.jpg)
/cloudfront-us-east-1.images.arcpublishing.com/octane/BQDGSOCD25DV3PUGIMHXMWMQNQ.jpg)
/cloudfront-us-east-1.images.arcpublishing.com/octane/Q3GWFKBZ7VFXTPHF3QLHFUS7TM.jpg)
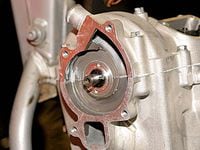
/cloudfront-us-east-1.images.arcpublishing.com/octane/AFLTDJEKPRHWZCASUTGEGPJZRQ.jpg)