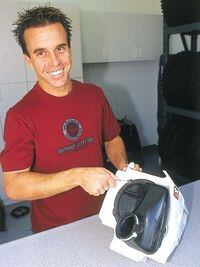
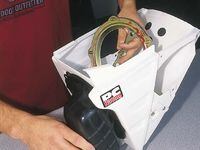
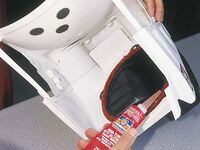
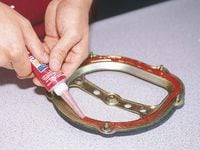
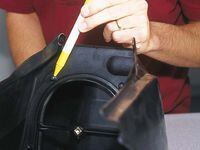
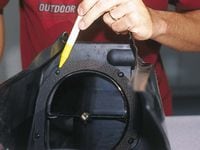
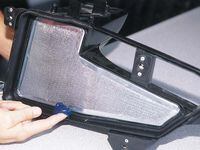
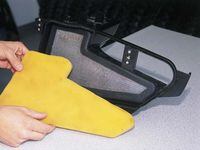
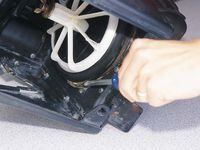
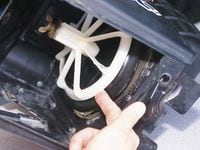
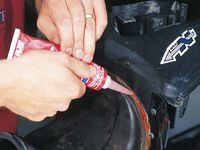
Although we appreciate and benefit from the wealth of technology and abundance of testing that goes into each model a manufacturer releases, there are times when the factories screw up, to put it bluntly. On those rare occasions, it's when the bikes are out on tracks and trails across the country that these oversights become apparent. Sometimes, they're simple defects, such as a cable routed incorrectly, demanding excess effort when pulling in the clutch. Other times, they may result in more serious consequences, things that might trigger a "service bulletin" or, in extreme cases, a recall. Companies like PC Racing have homed in on a specific area where manufacturers seem to have dropped the ball--the airbox. Many people don't give their bike's airbox a second thought. They figure it's enough to clean and oil the filter and maybe wipe up around the inside of the airbox once in a while. Sorry, Charlie--not good enough.While the manufacturers do an excellent job, they have a very limited amount of time to thoroughly test new models. That's why some minor flaws escape notice during testing and seem to show up only after the bikes are in consumers' hands. And even if you're one of those extra-cautious individuals who won't buy a brand-new model in its first year, preferring to wait until all the bugs are worked out in the second year, there's no guarantee the manufacturer will have resolved all the quirks.Throughout Dirt Rider's 20-year history, we have often told bike owners to reseal the airbox no matter what the make, model or year. It's a cheap and simple insurance policy against the potentially engine-destroying air leaks appearing in more and more models. The crew at PC Racing has achieved expertise in airbox shortcomings almost by default. One of the first products PC Racing offered was the Filterskin--a thin, cleanable prefilter that slipped snugly over the regular air filter. Since then, the product range has expanded, but a major part of its business continues to be air-related. So we tapped into that knowledge by asking PC Racing's J.J. Petchel and Greg Carlton for help with typical problems encountered. They provided a short list of some of the most popular bikes with airbox designs that may not be entirely effective or reliable. We'll also reveal how you can improve the airbox on your bike, even if it's a model not listed.1. Working on the airbox and airboot is easiest when both are removed from the bike. Be sure to clean the bike first. That makes any maintenance chores much more pleasant to tackle, as you can tell by the look on J.J. Petchel's face.2. On later-model Honda CRs you should remove the airboot plate nuts. This will allow you to separate the airboot from the airbox.3. Once that's done, you can remove the air filter mounting plate. (Of course, not every model--even from the same manufacturer--will have a setup exactly like this.)4. Make sure the surface where the filter mounting plate sits is clean and free of any oil residue, then run a generous bead of silicone around it. Petchel recommends something equivalent to the Permatex High-Temp RTV Silicone Gasket Maker he displays here, though a high-temp silicone isn't really necessary for this.5. Seal the air filter mounting plate with the silicone (after making sure it's clean, of course) and reassemble.6. Here, Petchel points out the nubs on the filter mounting surface of '02 and '03 CRs. These can obviously lift a portion of the filter away from the airbox, thus providing less sealing area and a potential entryway for dirt. If you choose to leave the airbox stock, be sure to apply grease liberally to the air filter's lip to ensure the best seal possible.7. If you install a Pro-Seal, you effectively negate the presence of the nubs and create a flat, even mounting surface for the entire air filter. This way you won't have to worry about greasing the filter lip.8. The airbox kit for '02 and '03 CRs and CRFs includes both a Pro-Seal and a machined-aluminum airboot plate and neoprene gasket. The gasket replaces the stock open-cell foam part--which is vulnerable to dirt and water--while the plate is much sturdier than the stock plastic unit so you won't get the sort of flex that leads to cracks in the sealant as the stock setup permits. If you leave things stock, regularly strip and reapply silicone to the airboot-airbox junction.9. The XR650R airbox employs a unique flat air filter. Be sure to apply lots of grease on the edges of the backfire screen and around the edges of the filter itself to prevent dirt from entering.10. Like other Pro-Seals, the XR650R version basically raises the filter mounting surface to provide a more robust filter-to-surface interface.Airbox design
It's nearly impossible for a bike that's ridden in the dirt to breathe perfectly clean air all the time. Hence they're equipped with air filters housed in airboxes to keep them as isolated and shielded from the elements as is practical. That way only the cleanest air gets into the engine. Not only does the airbox have to keep the filter clean but it also has to let as much air as possible get to the filter. Engineers could certainly design an airbox that would be 99 percent effective at keeping out dirt, but it would impede airflow so much engine performance would suffer. Airbox design must be a compromise.An often overlooked part of the equation is the airboot, which connects the airbox to the carburetor. While it is a closed system, time and abuse often conspire to introduce leaks. The airboot should be closely inspected for any cracks, holes or tears that would render the air filter meaningless. If you find a potential entrance for dirt, fix it by either sealing it or replacing the entire airboot."If you ride in bad conditions long enough and the filter starts plugging up, it's going to find a way to get air into the engine, and it may find a crack or crevice that's going to allow some dirt ," Petchel warns. More on this later, but the key thing to remember when analyzing the air intake system is that dirt will try to enter through the path of least resistance. Locating and identifying likely paths should be part of your regular maintenance.Problem airboxesThe following are some of the bikes whose airbox problems generated the most queries to PC Racing, what PC's investigation into the matter unearthed and what the crew did to remedy them.2002 Honda CR125R/CR250R/CRF450R****The Problem
In the quest to shave weight wherever possible, Honda eliminated the metal air filter mounting plate inside the airbox, a piece used since 1988. This dropped approximately five ounces.However, what PC Racing--and some unlucky owners--discovered was this rigid plate served ably as the main support for the sealing area of the airboot. The new design features a comparatively thin plastic airboot plate for support, and the area flexes fairly easily--especially under a hard-charging rider who aggressively grips the middle of the bike with his knees. As a result, the seal between the airboot and airbox can crack and let in debris. Additionally, the new design incorporates nubs on the mounting surface for the filter inside the airbox. "These nubs push the air filter away from the airbox and sometimes pull the air filter lip away from the cage," Petchel says. And to top it off, the air filter cage doesn't fit properly, which often results in a large gap between the cage and the airbox.The Solutions
A. Drill, grind or machine out a few millimeters from the center of the air filter cage where the mounting bolt runs through. This will allow the cage (and, thus, the filter) to sit lower. Ideally, the filter should fit firmly against the mounting surface. Grease the air filter lip liberally, especially if it doesn't seat firmly. B. If you don't want to grease the filter regularly, an option is to install a Pro-Seal neoprene gasket. It's 1/4-inch thick, is designed specifically for these models and creates a flat sealing surface for the filter. C. Disassemble the airbox and seal the airboot junction with RTV silicone (available at any auto parts store). Do this regularly! D. Replace the thin plastic stock CR/CRF airboot plate with a more sturdy aluminum plate from companies such as PC Racing, Twin Air or MX Bonz. PC Racing's kit also includes a neoprene gasket. The replacement plate is much more rigid, and it'll compress the neoprene gasket to provide the necessary seal as well as eliminate the need to use silicone.2003 Honda CR125R/CR250R****The Problem
While Honda fixed the airbox ailment on the '03 CRF450R, the two-strokes simply got temporary Band-Aids that didn't address the real cause. The filter cage fits better than the '02 versions, but the nubs in the filter mounting surface are still present. Also, instead of using the relatively fragile silicone to seal the airboot to the airbox, Honda employed an open-cell foam gasket. This is good since it won't pass the massive amounts of dirt that a broken silicone seal will. However, the open-cell foam will pass fine dirt or water directly into the airboot where nothing stands between it and the engine's internals.The Solutions
A. The filter option is to grease the air filter lip liberally. B. The airboot option is the same as for the '02s except the stock open-cell foam airboot gasket must be removed before using silicone or installing the PC Racing kit.2000-2003 Honda XR650R****The Problem
A unique design, the air filter is a large, flat piece of foam that's supposed to sit flush against both the backfire screen and the edges of the filter mounting surface within the airbox. However, dirt can easily make its way into the engine via the outer edges of the filter.The Solutions
A. Grease the outer edges of the air filter liberally. B. Install a Pro-Seal air filter gasket. The one made for the XR650R is designed to stick to the backfire screen with the remainder a bit oversize. You must tuck the "excess" neoprene into the outer edges of the filter mounting surface. The Pro-Seal eliminates the need to grease the edges of the filter.2003 Kawasaki KX125/KX250
The Problem
The new KX airboxes has generously sized inlets, permitting the engine to draw massive amounts of air and make lots of power. For supercross and prepped moto tracks, this is great. However, if you ride in conditions that are less than ideal, you'll find this design also admits lots of dirt, quickly leading to a clogged air filter. This, of course, results in poor engine performance, excess fuel usage and possibly dirt ingestion. Water may also wreak havoc, whether it sneaks in from washing the bike or riding in wet conditions.The Solutions
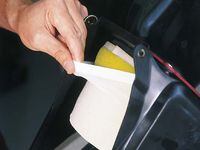
A. Cover the filter with a plastic bag when washing the bike. B. Grease the air filter lip (or install a Pro-Seal). C. Cover the airbox inlets with skid plate open-cell foam (which should be cleaned regularly) or close the side inlets with duct tape (if you expect wet conditions). D. Cover the filter with a Filterskin to provide an extra layer of protection. Racers may opt for the quick-release version.2003 KTM 250 SX
The Problem
While the engineers put the 250 SX on a successful diet, they overlooked one area that needed more strength--the air filter cage. It tends to collapse and warp, which leads to dirt sneaking past the air filter lip and into the engine.The Solutions
A. Buy a cage for a 450 SX. It's stiffer. You'll need to remove the backfire screen (unnecessary on a two-stroke) and grease the lip of the filter. B. Install a Pro-Seal.2003 Suzuki RM125/RM250 and 1993-2001 Yamaha YZ125/YZ250/YZ250F/YZ400F/ YZ426F/WR250F/WR400F/WR426F
The Problem
These bikes share air filter and cage designs so closely they have the same small gap between the air filter lip and the filter's mounting surface, even when the mounting bolt is tight. This, of course, is not good! Dirt will make it past the air filter lip.The Solutions
A. Drill or grind the center of the cage's mount as must be done on the '02 Honda CRs; this will let the cage--and filter--sit closer to the mounting surface, though you should still grease the lip of the filter to be safe. B. Fill the gap with the added thickness of a Pro-Seal.2002 and 2003 Yamaha YZ125/YZ250/YZ250F/YZ426F/ YZ450F/WR250F/WR426F/WR450F
The Problem
Yamahas use a sort of oversize hose clamp to secure the air filter mounting plate inside the airbox. This can loosen, with predictably dire results. Also, the air filter cage doesn't fit very well; stock, it doesn't seem to let the filter sit down far enough on the mounting surface. Though the filter does touch the surface, you can still fit your finger between the two. Ride in severe dust or sand to the point where the filter begins to clog, and dirt may just slip past the filter's lip and into the engine.The Solutions
A. Regularly check the clamp to make sure it's tight. B. Drill or grind the center of the cage's mount to let the filter sit lower, though you should still grease the filter's lip. C. Install a Pro-Seal.1-2. New YZs feature a large hose clamp inside the airbox. Check this regularly to make sure it's tight or it will provide a possible entry for debris. (The blade screwdriver seen here is used only for illustration since we didn't have a Phillips around.)3. A big problem common to both RMs and YZs: The filter cage doesn't snug up to the filter mounting surface as it ideally should, even though the wing nut is tightened all the way. As you can see, there's a finger-width gap, which is up to the filter to fill. But you can't expect the filter alone to reliably seal this without the aid of lots of grease.4. YZ airboxes also benefit from a fresh, large application of silicone to the airboot-airbox junction; PC Racing's found the factory-applied sealant to be on the thin side and prone to cracking, opening the door to ingesting dirt. Be sure to strip the old sealant and clean the area first.5. PC Racing recommends doubling up on protection by using its Filterskin. It's made of a material that should be washed and cleaned like a regular filter, but it's very thin, more convenient to service and able to keep the filter cleaner longer.Bikes not mentioned
Just because your bike isn't listed here doesn't mean it won't benefit from careful examination of its air-intake system. Ask yourself if your bike's filter seems to get dirty quicker than the filters on your buddies' bikes. Or if the engine need rings or bearings or something else sooner than expected. When you pull out the filter, is there dust in the airboot? If so, chances are there's a deficiency somewhere in the system.Begin by thoroughly cleaning the bike, then removing the airbox and airboot. (This is probably easiest if you also take off the subframe.) Check the seal of the filter to the mounting surface. If you can poke your finger between these two items anywhere along the circumference, you've found the problem. You may be able to simply apply lots of grease to the filter's lip and/or modify the filter cage as seen above. PC Racing offers a universal-fit model of Pro-Seal. Make sure the seal between the airboot and airbox isn't compromised. This is an area that should be checked regularly. If you find any cracks, strip away as much of the old sealant as possible (if any) and reseal the entire joint with a good RTV silicone (high-temp stuff is unnecessary). "The factories, 99 percent of the time, don't use enough silicone to seal properly," Petchel says.If the airboot-airbox union seems a bit too flexible (as with CRs mentioned previously), you may want to see if it's possible to construct a sturdy airboot plate from a sheet of thin aluminum stock. If it comes to this, you'll need more than the usual tools, of course, and should probably take the job to a machine shop or a friend with the appropriate machines.Some airboxes, like the KXs, have generously sized inlets. Cover these (duct tape works well) and wrap the filter in plastic before you wash the bike. To extend the interval between filter services, consider covering the inlets with an open-cell foam. If you go this route, oil and clean this foam as well as the air filter when you do postride maintenance. And if you're going to be riding in extremely wet conditions, by all means consider covering some of the inlets with duct tape to reduce the amount of water that enters the airbox.The number one tip is, of course, to regularly clean and oil your air filter. "Even if is sealed properly, people just don't clean their air filters as often as they should, so dirt may pass through their filters just because they're not cleaning the filter," Petchel observes.Oil And Accessories EXPLAINEDA number of oils for air filters are on the market, and PC Racing has experience with nearly all of them. What do the guys there have to say about them and different air-related accessories? Read on. Petchel lists Bel-Ray and Maxima's FFT oils as his favorites. Why?"They're a real heavy oil, and it's real tacky and sticky," he says. "It stays on the filter well, and because it is so thick, we believe it filters better as long as you don't overoil it. Squeeze all the excess oil out, and you're not going to have any problems with restricting airflow."No Toil's unique biodegradable product falls into the "very good" category. "I like No Toil. It's the easiest to use; it's the easiest to clean and service your filter , but because it's such a lightweight , it doesn't seem to filter as well," Petchel says. Spray-on oils are much the same; they go on very thin before the carrying agent dissipates. It is very important when using a spray-on oil to saturate and knead the filter to better spread the oil."The stuff I recommend using--the pour-on stuff--there's no way you're going to get that through an aerosol can; it's just nasty, sticky stuff, but it works great for what it's supposed to do. In general, if you're riding in severe dust or sandy conditions, a pour-on oil," Petchel says.Greg Carlton adds: "In your open-cell filters, the oil...creates a 'web' around the open cell, and that's what stops the dust. stop most of the dust, what's getting through is just real fine dust. I think that's what's lacking with the canned sprays ."Not only that, but the filters they make nowadays are much thinner. That's what we've noticed with the CRs. Aftermarket companies are making thicker filters. made thinner for better airflow."The last thing you'd want to use on your filter is regular motor oil, as it's designed to remain a constant viscosity. Thus, it won't thicken at all after applying it and will simply drain to the bottom of the filter where it will run off. "Spend the extra couple bucks on air filter oil and save yourself hundreds of dollars on your engine; it's worth it," Petchel insists. "More than promoting any particular brand, I think it's just the type of oil . Don't use motor oil. And if you're riding on anything other than a watered motocross track, be aware that spray-ons and No Toil could be problematic."For extra protection, PC Racing offers the Filterskin, which provides an added layer that dirt must penetrate and keeps the filter clean longer. The Filterskin is designed to be oiled and cleaned like a regular foam air filter, but it's a lot easier to work with so servicing it for every ride isn't as much of a chore. Racers will enjoy the quick-release version. "I think the main thing , once people start using them, is just the convenience of not having to clean your filter as often," Petchel says.

/cloudfront-us-east-1.images.arcpublishing.com/octane/WNW3SON2YRFY3NTE4YIJXH7MAE.jpg)
/cloudfront-us-east-1.images.arcpublishing.com/octane/V5HV72XGS5BDBLGO7KNAPV2SKE.jpg)
/cloudfront-us-east-1.images.arcpublishing.com/octane/X4HH3H6LWFEAXFAOS4D7WPCBGU.jpg)
/cloudfront-us-east-1.images.arcpublishing.com/octane/KIWKUCDIAZEDXBC53B4CL23XX4.jpg)
/cloudfront-us-east-1.images.arcpublishing.com/octane/Z7SDMK75WBCKPOECPH2ZZC3MSE.jpg)
/cloudfront-us-east-1.images.arcpublishing.com/octane/2D4H2OGFH5ABPA4WIRHNSMBER4.jpg)
/cloudfront-us-east-1.images.arcpublishing.com/octane/MNV7VIZGBZACLJBL2WV7WVO7VU.jpg)
/cloudfront-us-east-1.images.arcpublishing.com/octane/H3ANF3MCT5BONNQAQISDYEJA4I.JPG)
/cloudfront-us-east-1.images.arcpublishing.com/octane/J7F3JQP2OVDLXDZ7VBJDMVGB4A.jpg)
/cloudfront-us-east-1.images.arcpublishing.com/octane/D3SZKDPELNAKPNAQIHTLZRF5QM.jpg)
/cloudfront-us-east-1.images.arcpublishing.com/octane/H5VKBUL2Z5BYDAOQOUQAHKOTEU.jpg)
/cloudfront-us-east-1.images.arcpublishing.com/octane/C2HS5ADXIND7LBDK37LGI5RN4E.jpg)
/cloudfront-us-east-1.images.arcpublishing.com/octane/SCDNATMCERHOHPEVO3JPCS6M2Y.jpg)
/cloudfront-us-east-1.images.arcpublishing.com/octane/TOQ7IBXN2BAV5MELGO5Y3W64UE.jpg)
/cloudfront-us-east-1.images.arcpublishing.com/octane/CSQ5SXR2QZEYLIH4GZVFYPKXNU.jpg)
/cloudfront-us-east-1.images.arcpublishing.com/octane/MLARWRCDL5HH3FYTXFXK26ARF4.jpg)
/cloudfront-us-east-1.images.arcpublishing.com/octane/QHHRQIMLX5DQREULLI7LJT2WOM.jpg)
/cloudfront-us-east-1.images.arcpublishing.com/octane/2MFKDMEXI5A2PAB2BCLJ4TE6CI.jpg)
/cloudfront-us-east-1.images.arcpublishing.com/octane/BCRBSND54FE3BDDWWMPP6LWCAY.jpg)
/cloudfront-us-east-1.images.arcpublishing.com/octane/53OLCW5X45HRTLKV5OVHFCJSJA.jpg)
/cloudfront-us-east-1.images.arcpublishing.com/octane/PUS7VYTISVCVXGLWRGNHS7ZR4M.jpg)
/cloudfront-us-east-1.images.arcpublishing.com/octane/UO25RAAEQJDIVLNGY2L7S4IRDQ.jpg)
/cloudfront-us-east-1.images.arcpublishing.com/octane/3GQBZGCTXRE35IIIOI22RBQSOU.jpg)
/cloudfront-us-east-1.images.arcpublishing.com/octane/OIT4RWYSOJGOFJE2LLVSYGMRXY.jpg)