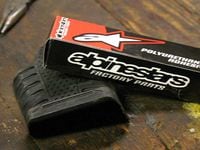
If you ran out and bought a pair of Alpinestars' finest the second they hit shelves last year, odds are you'll need to be replacing those soles any time now. So you head to the local shop and pick up the sole replacement kit. The five-step instructions on the back make it sound easy and simple to change them out, but on our first go at it, we found out it was a more tedious project than we had expected. Here's a quick step-by-step how-to on performing this necessary Tech 10 maintenance.
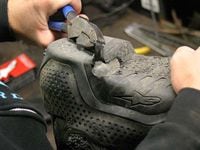
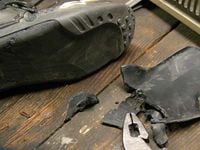
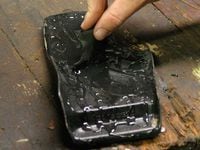
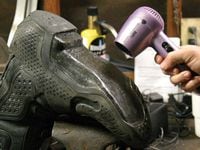
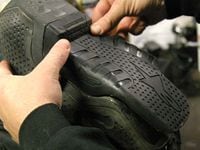
Alpinestars' innovative Tech 10 is designed with a strong internal structure, with a soft and thin (by comparison) sole insert. Don't neglect changing out the soles because if you wear through them to the base of the boot, once you do get around to changing the inserts, you'll find the replacements have nothing to adhere to.This pair has shown significant wear; the sole is worn through to the bottom of the boot in front of the heel.When buying replacement sole inserts, be aware that they come in sizes. Parts guys may not even be aware of this (ours wasn't), so make sure you buy the right size.We started by planting the boot in front of this ancient fire-hazard of a space heater for about 30 minutes.Once the boot rubber was warm and malleable, we started at the worn out areas and began pulling off the insert with pliers, trying to keep the pieces in large chunks. The boot needed to re-heat in between all the cursing and sweating (er... I mean removal of insert pieces).A razor blade helped loosen the edges from the base of the boot.Once the sole is removed, clean up any dirt from the insert area (if you tend to your boots before they wear through the sole, you won't have any dirt to clean up). If necessary, use only water to clean up dirt; any chemicals could compromise the polyurethane adhesive.Once clean, use some rough sandpaper (instructions recommend a wire brush, but we elected to use something less harsh) to scour the insert bed focusing on the edges. This serves two purposes: getting rid of any leftover insert pieces, and scoring the surface, allowing for better adhesion.Use the sandpaper to score the bottom of the replacement sole, as well.Apply the polyurethane liberally to both surfaces. We used a chunk of the old insert to spread the glue out evenly over the soles, trying not to let the glue drip onto the outer boot.Once applied and spread, instructions say to let it sit for 25 minutes, after which time, both surfaces will be totally dry to the touch.Then it's time to heat up again using the hairdryer. The polyurethane glue will soften up after a few minutes of heating them. Once the surfaces touch each other, they will set almost instantly. So get it right on the first shot!Starting at the base of the heel, we lined up the insert and began adhesion, working our way toward the toe of the boot.Apply pressure for about 30 seconds as the instructions direct, and the insert is set.

/cloudfront-us-east-1.images.arcpublishing.com/octane/H4KABM4SEJFERHXWYNNTFE6LDQ.jpg)

/cloudfront-us-east-1.images.arcpublishing.com/octane/METMMYYRXBEJPEZHCAEZEH6VVU.jpg)
/cloudfront-us-east-1.images.arcpublishing.com/octane/NI2CB2MHXVDTBPSC75NLNUH2BA.jpg)
/cloudfront-us-east-1.images.arcpublishing.com/octane/DQANNTY25RAZFOVGPFSWN4FQP4.jpg)
/cloudfront-us-east-1.images.arcpublishing.com/octane/MUO4JSZDR5C3PGKGSD6FVAJJSM.jpg)
/cloudfront-us-east-1.images.arcpublishing.com/octane/I2DNPZFA4VAFLDTL35J3QNROIQ.jpg)
/cloudfront-us-east-1.images.arcpublishing.com/octane/P73FNKUARJCCNFVRLHOEPMFZHE.jpg)
/cloudfront-us-east-1.images.arcpublishing.com/octane/KMEUYMP6QZCE5JFLPHKIZC4UGA.jpg)

/cloudfront-us-east-1.images.arcpublishing.com/octane/C4N7UKZHNNF4NAETC5OXPYVNLA.jpg)
/cloudfront-us-east-1.images.arcpublishing.com/octane/RONFCVTGOBAW3IZ6PC3JAATJKA.jpg)
/cloudfront-us-east-1.images.arcpublishing.com/octane/FVUN2GYPPZFCVJKSVNFMRUUYUU.jpg)
/cloudfront-us-east-1.images.arcpublishing.com/octane/4BBJZZGBZNA5JBNUENWO3YZDCY.jpg)
/cloudfront-us-east-1.images.arcpublishing.com/octane/W5Y6FA2ALBGUBB4CF4TLKGGGX4.jpg)
/cloudfront-us-east-1.images.arcpublishing.com/octane/X237GYIQSNDRRJKGUFZB6JI62I.jpg)
/cloudfront-us-east-1.images.arcpublishing.com/octane/LZCKRNRZFJCDBERJZRZ7OD2YSQ.JPG)
/cloudfront-us-east-1.images.arcpublishing.com/octane/74NGPXXTXJFHVEUC4LCKB4B5YI.jpg)
/cloudfront-us-east-1.images.arcpublishing.com/octane/3BU6HTISE5FMLPVQLLPZ5BOTYY.jpg)
/cloudfront-us-east-1.images.arcpublishing.com/octane/GXUL6KCPBVEKDAVSKMN5MC4CMA.jpg)
/cloudfront-us-east-1.images.arcpublishing.com/octane/WBOGHOZLU5BKRLSCVCGKOVVY34.jpg)
/cloudfront-us-east-1.images.arcpublishing.com/octane/OJ5NCD4CE5DO7FPSOXULAXAWQE.jpg)
/cloudfront-us-east-1.images.arcpublishing.com/octane/S6VCF2Y7ZZDTTII2TUKZBZ73DM.jpg)
/cloudfront-us-east-1.images.arcpublishing.com/octane/4HRBOLM5G5BYDLVR4BOSHU4F3Q.jpg)