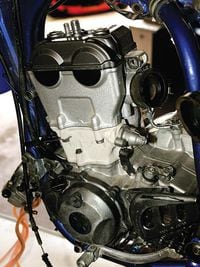
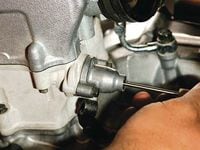
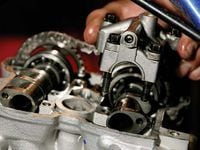
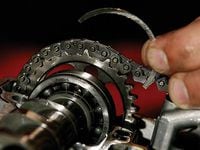
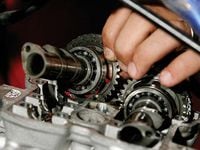
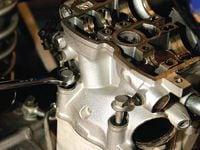
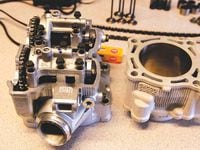
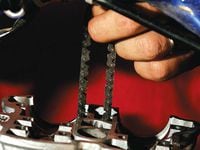
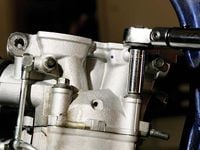
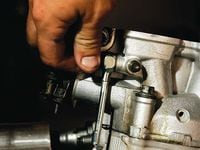
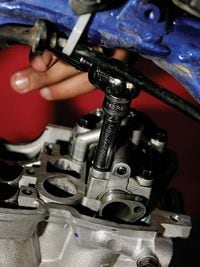
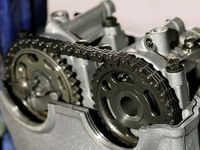
Yamaha's YZ250F has existed for more years than any of the other 250cc four-strokes, so it is less of a mysteryone reason we left it for last in our series on small-bore four-strokes. The other reason is the Yamaha has fewer weaknesses to pinpoint. In fact, we had FMF Racing's Dave Dye show us the intricacies of the engine, and he felt it really had no Achilles' heel. Most recently Dye wrenched for Chad Reed for both the Yamaha factory team and during his stint with Yamaha of Troy, but before that he wrenched for Steve Lamson, Tim Ferry and Brian Swink. However, a race team such as YoT routinely changes valves, pistons and cam chains, so they may never see problems that an average ownerwho leaves those same parts in play much longermight encounter.For expertise on engines that have been subjected to typical weekend-warrior abuse and maintenance, we turned to Thumper Racing. The company warned that the cam chain may be a weak point. Thumper recommends changing the cam chain twice a year and the valves once a year for a YZ250F that is ridden hard. The cam chain is less than $20 and is extremely easy to change any time you are checking valve clearance.As with any of the new-generation small four-strokes, we were impressed with the minimal amount of effort required to perform a top end rebuild.1. To get started, drain the coolant and the oil, remove the exhaust pipe and header and get any parts that keep you away from the motor out of your way. Remove the spark plug so it is easier to turn the engine over.2. Dye also removed the carburetor to make working on the head easier and provide more room to get hands and tools in place.3. You'll need to move the clutch cable since it is blocking access to the cylinder. The more room you can give yourself to work, the better. Dye used pliers to move the actuating arm and get enough slack in the cable.4. Now the engine is ready for us to begin. The head stay is removed, the oil breather hoses are disconnected, the carb is removed and the coolant hoses are disconnected. (It isn't necessary to completely remove the radiators, but we did so to make photography easier.)5. Pull the cam cover. Dye used a 3/8-inch-drive T-handle with an Allen socket. A T-type Allen wrench with a ball end works well, too.6. Remove the plugs in the ignition cover to rotate the crankshaft and line up the timing mark on the ignition rotor with the indicator on the ignition cover. The hole is small, so a compact flashlight helped us see what we were doing.7. When the timing marks are lined up, the lobes on the intake cam should face to the rear, the exhaust cam lobes should point forward and the dots on the cam sprockets (two on the intake cam and one on the exhaust cam) should line up with the head's upper gasket surface. The pointer shows the rearmost dot, but you can also see the one on the other side of the intake cam sprocket.8. Pull the bolt out of the back of the cam-chain tensioner. Insert a small-blade screwdriver into the bolt hole and roll the cam-chain tensioner back in by gently turning it clockwise until it locks. That will take the tension off the cam chain. We find it easier to simply remove the tensioner to get the maximum play in the chain.9. Pull out the small bolts that hold the cam bearing caps. Then hold the bearing caps at the bottom and carefully work them loose.10. As on the other 250cc four-stroke motocross engines, there are locating clips in the cams that you don't want to drop down in the engine. Lift the cams slowly, and watch for the clips as you go.11. Lift the cam so the right side is a little higher and the sprocket drops down into the cam-chain channel, then pull the cam chain away from the sprocket and lift out the intake cam followed by the exhaust cam. We are changing the cam chain, so we just dropped the chain down in the cam-chain passage.12. Remove the head bolts. The YZ has long bolts that hold down the head and cylinder. Pull them out. The bolts have washers under them, but the oil in the head will hold them until after the head is off. It is safer to leave them in place than try to pull them out and risk dropping them into the engine.13. Remove the bolt that holds the oil line to the head. There is a crush washer on each side of the fitting. One will come off with the bolt, but the other can fall out and get lost if you don't watch for it. Both washers should be replaced. They are designed to be used only once.14. You will also need to remove these two small bolts that seal the head to the cylinder on the cam-chain side. You must use a wrench; a socket won't fit.15. Pull off the head, but use care so you don't knock any of the gasket surfaces into the frame tubes. Check the location of the dowel sleeves that are in the head and the cylinder.16. We sprayed contact cleaner into the ports to see if the valves were still sealing properly. The YZ250F had a full 18 months of use before our rebuild. Nevertheless, the valves were sealing perfectly. We cleaned up the gasket surface with a Scotch-Brite pad but made sure not to touch the surface of the valves.17. Then we put the cams back in the head in the proper place, replaced the cam-bearing caps and torqued the caps to the proper specs from the manual.18. We checked the valve clearances with the head on the workbench using Motion Pro feeler gauges. These gauges have a solid handle with a prebent feeler-gauge tip and are extremely easy to work with. The YZ250F should have 0.13mm clearance on the intakes and 0.20mm on the exhaust side. All five valves still had perfect clearance, so we felt confident assembling the engine without doing anything more to the valves.19. Before the cylinder can be removed, this bolt must be removed from the cam-chain side of the cylinder. Then the cylinder should come up easily.20. The YZ uses a snap ring in the piston pin instead of circlips, so use snap-ring pliers to remove the rings. Then pull the piston pin and remove the piston. Stuff the cases with a clean rag to prevent losing the clip.21. Before the ignition cover can come off, the shift lever needs to be removed.22. Next we pulled the ignition cover to start the cam-chain replacement. This is one reason we drained the oil before starting the job.23. Use an impact-driver to get the center retaining bolt out, then use a Motion Pro or Yamaha ignition puller to remove the rotor.24. Pull out the stator plate with a T30 Torx bit then pull it aside. The plate can go in only one way, so don't worry about marking the location.25. Remove the rear cam-chain tensioner by removing the two bolts at the bottom. Next slide the tensioner down and wiggle it out through the bottom.26. Clean up the gasket surfaces on the cylinder, cases and head. Remove the gasket pieces, and clean the surface with a Scotch-Brite pad. After all the parts are clean, organize them and get them ready for assembly.27. Install one of the snap rings in the piston pin, then oil and install the piston pin partway.28. Install the piston rings as directed in the manual. We used a Wiseco piston, and it came with its own instructions for the ring gaps, but they are essentially the same as the manual suggests. The important thing is the ring gaps are all at different spots. Put a little four-stroke oil on the piston and rings.29. Install the piston on the connecting rod, and insert the other snap ring. Again, it is safest to cover the opening to the cases with a rag, unlike this photo.30. Take care with the rings as they go into the cylinder. They need to be compressed with your fingers before you attempt to slide the cylinder over. The side rails of the oil ring are very thin and can snag and be damaged very easily. With the engine in the bike, we found it easier to install the piston into the cylinder while it was on the bench. We slid the piston in just slightly, so the rings were fully inside the bore but the pin boss was still fully exposed below the cylinder.31. Then we installed the base gasket, slid the piston and cylinder down, and installed the piston pin and second clip before easing the cylinder down. In addition to the new gasket, there is an O-ring around the dowel for the water passage at the front right corner of the cylinder.32. Drop the new cam chain down through the cylinder into the crankcase. Slip it over the end of the crank, and get the chain on the sprocket. Slide the cam-chain guide up through the cylinder and bolt it in.33. The stator goes in only one way, so position it, slip in the Torx bolts and snug it down.34. Impact the rotor on while holding the cam chain tight to secure the engine.35. Install the ignition cover after setting the ignition back at the correct timing mark.36. Slip the front cam-chain slide into the cylinder. Make sure the bottom tip is seated in the notch in the cases it is supposed to sit in. When it is located correctly, the nubs on the side of the slide will be below the surface of the cylinder. Install the new cylinder head gasket and the dowel collars in the top of the cylinder.37. We removed the cams and cam-bearing caps then installed the head back onto the cylinder. Hold the cam chain up while the head is sliding down.38. Install the head bolts. Don't forget the washers. Torque the head bolts in two steps: First, torque them all to 14 foot-pounds; second, torque them to 27 foot-pounds to finish up.39. Put the oil line back on with new crush washers (one on each side of the fitting).40. Dye finds it easiest to install the exhaust cam first. Make sure the crank is still set on the correct mark and install the cam. The exhaust cam has two dots on it. One is straight up; the other aligns with the machined edge of the head at the front of the engine. With the dots lined up, pull the cam chain across then install the cam-bearing caps and torque them to 7 foot-pounds or 84 inch-pounds in a crisscross pattern.41. Install the intake cam next. Again, line up its three dots; two with the machined surface of the head, and one pointed straight up. When the cams are in correctly, there should be 12 pins in the cam chain between the top dots on both cams.42. Release the cam-chain tensioner and install the bolt in the rear. Recheck that all the timing marks are lined up before installing the plugs in the ignition cover.43. Install the cam cover and reassemble the bike.44. You're now ready for that break-in ride!


/cloudfront-us-east-1.images.arcpublishing.com/octane/X237GYIQSNDRRJKGUFZB6JI62I.jpg)
/cloudfront-us-east-1.images.arcpublishing.com/octane/LZCKRNRZFJCDBERJZRZ7OD2YSQ.JPG)
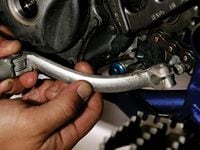
/cloudfront-us-east-1.images.arcpublishing.com/octane/74NGPXXTXJFHVEUC4LCKB4B5YI.jpg)
/cloudfront-us-east-1.images.arcpublishing.com/octane/3BU6HTISE5FMLPVQLLPZ5BOTYY.jpg)
/cloudfront-us-east-1.images.arcpublishing.com/octane/GXUL6KCPBVEKDAVSKMN5MC4CMA.jpg)
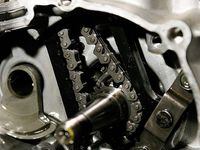
/cloudfront-us-east-1.images.arcpublishing.com/octane/WBOGHOZLU5BKRLSCVCGKOVVY34.jpg)
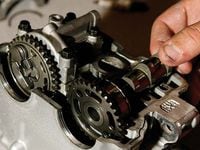
/cloudfront-us-east-1.images.arcpublishing.com/octane/OJ5NCD4CE5DO7FPSOXULAXAWQE.jpg)
/cloudfront-us-east-1.images.arcpublishing.com/octane/S6VCF2Y7ZZDTTII2TUKZBZ73DM.jpg)
/cloudfront-us-east-1.images.arcpublishing.com/octane/4HRBOLM5G5BYDLVR4BOSHU4F3Q.jpg)
/cloudfront-us-east-1.images.arcpublishing.com/octane/PCXWZ5GQLRFFPJ7M7UGTETJEXQ.jpg)
/cloudfront-us-east-1.images.arcpublishing.com/octane/Q7KM7SH27VBIRMZ3XAIUHOWCTU.jpg)
/cloudfront-us-east-1.images.arcpublishing.com/octane/QBCJYVX6GBFRJOF67CQTOQWJRU.jpg)
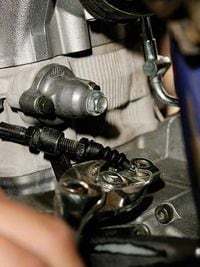
/cloudfront-us-east-1.images.arcpublishing.com/octane/U6WTHXX6FZG5VMXN2X5X4JPV2M.jpg)
/cloudfront-us-east-1.images.arcpublishing.com/octane/U2L5VUGESJCYRGGIYVBTKAW5LY.jpg)
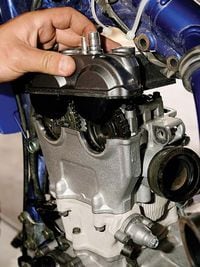
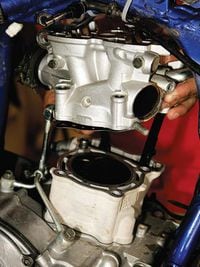
/cloudfront-us-east-1.images.arcpublishing.com/octane/SDPXS7Q2CVGRHI7TNZAUMHQVRU.jpg)
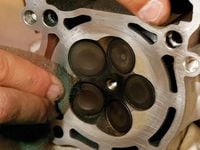
/cloudfront-us-east-1.images.arcpublishing.com/octane/4WKWAMC6PJBYXMGEOT6M3324K4.jpg)
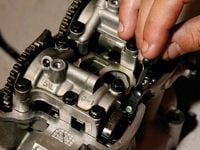
/cloudfront-us-east-1.images.arcpublishing.com/octane/MUHABH5BPZCCDGBH3LMD6R63KA.jpg)
/cloudfront-us-east-1.images.arcpublishing.com/octane/DFFWUKLLEJAFBNZYSZMVZ3ZDGU.jpg)
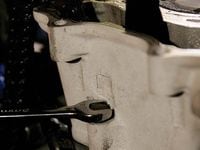
/cloudfront-us-east-1.images.arcpublishing.com/octane/PYWSKZ2A5FAGLG5NMGFO7ZDVVY.jpg)
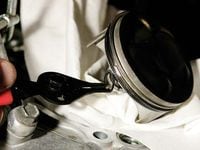
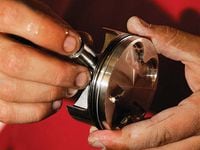
/cloudfront-us-east-1.images.arcpublishing.com/octane/IDV5JZQ5MVEFVN7VWEHUTY3TF4.jpg)
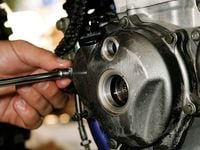
/cloudfront-us-east-1.images.arcpublishing.com/octane/TEEQ6FQCK5G5JNWFA743XPQ7PU.jpg)
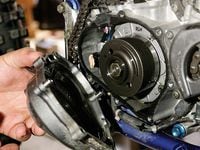
/cloudfront-us-east-1.images.arcpublishing.com/octane/S4KLUEUZHZAITFWF3PUKKB7M7Q.jpg)
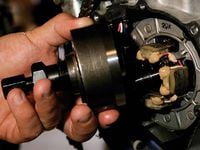
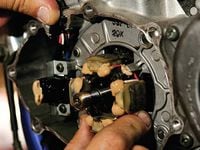
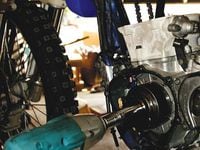
/cloudfront-us-east-1.images.arcpublishing.com/octane/5EEWHROAHNFQXIKLZLZFGI63YE.jpg)
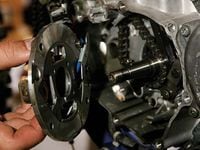
/cloudfront-us-east-1.images.arcpublishing.com/octane/DKFBOYNXGBA4BBX7RV56BVCDIA.jpg)